Here is a flower card I wanted to share with you today. This card is really cool because the flowers pull out like this:
To make this card you start with a piece of card stock that is 9 by 3 1/2 inches. Then you score it along the long side at 2" and 5 1/2 inches. The little two inch part will be to top of your pot so you can fold that front flap down. I used the eyelet border punch to make the fancy edge. Then fold it in half at the 5 1/2 inch score line and cut in on the sides (not the two inch part) to make it look like a pot. I didn't put any glue on the pot, just used the ribbon to keep it closed.
For the part that pulls out I cut a piece of old olive card stock that was 4 1/2 by 2 1/2 (then layered a white piece over it just a tad smaller at 4 1/4 by 2 1/4). Then you just punch out some flowers out of fun paper. For this card I used the Razzleberry Lemonade Designer paper from Stampin' Up! I used the XL flower punch the make the flowers and the 5 petal flower punch to make the leaves. For the centers I used the 1/2 circle punch and crushed curry card stock! I used a dimensional dot to make the flower in the center pop up. Make sure when you're attaching your flowers that you set it on top of an envelope (if you plan on mailing it) so that you don't make your card too tall to fit in the envelope... that's what I did the first time and had to redo mine :)
Hope you're having a great weekend!
stamps:Sincere Salutations
paper: soft suede, whisper white, old olive, crushed curry, Razzleberry Lemonade
ink: melon mambo
other: yellow grosgrain ribbon, border punch, XL flower punch, 1/2 circle punch, 5 petal flower punch
Sunday, May 30, 2010
Friday, May 28, 2010
Rose
Yesterday I showed you how to make a vase using the ornament punch, today, I'm showing you a ROSE I made with it. Isn't this pretty? I made it at my uplines house last week. It's really easy to make. You start with a circle and then punch out 4 ornaments, curl them with your finger and attach them along the edges using the top side of the ornament. Then just keep repeating (starting from the outside edge of the circle and layering them into the center). It does take a lot of punches but it is so pretty! As you get closer to the center you can roll the petals a little tighter.
Here's a close up:
Thursday, May 27, 2010
Ornament punch vase
When I was at Stampin' Up! Regionals I saw cards using the ornament punch to create a vase so I had to try it myself. I love being able to use a punch for lots of different things - a great way to get your money out of stuff is to find versatile ways to use it.
This was one of my cards for my stamp-a-stack last week too. It's really simple to make. I punched the "vase" using the ornament punch and then snipping off the pointy bottom part to make a flat bottom. Then I stamped the flowers from the Eastern Blooms stamp set on a piece of paper that was cut into that cute shape using the top note big shot die. To get the flowers all those fun colors I just inked it with markers instead of using an ink pad. It takes a little longer that way but it is such a cool result, don't you think? Then to add some more dimension I added on a couple flowers punched out with the trio flower punch with glue dots. The sentiment "for you" is from the set Great Friend.
stamps: Great Friend, Eastern Blooms
ink: markers -- rich razzleberry, regal rose, pretty in pink, soft suede
paper: rich razzleberry, whisper white, pretty in pink
other: ornament punch, rose grosgrain ribbon, trio flower punch, big shot top note, brads, glue dots
Wednesday, May 26, 2010
Hula!
The set Tropical Party makes me think of luas and hula skirts so I thought I'd make a card with a skirt on it! I started with a pumpkin pie cardstock base. To make the skirt part, I just took a scissor and cut slits all the way across the green part and then adhered it on the top. The top of the card is a piece of soft suede textured in the big shot using the square lattice embossing folder.
For the floral image I used a technique called poppin' pastels. It's really easy. All you do is stamp your image in versamark ink and then use a sponge and pick up color from of the stampin' pastels and dab it on top of the versamark. The pastels will stick to the versamark and give it instant pretty, soft color! I did the flowers first and then went back and did the branches so I could see where to put them. Then I stamped the sentiment "thinking of you" in soft suede ink. This sentiment is from the set Sincere Salutations.
Hope you enjoy!
stamps: Tropical party
ink:soft suede, versamark
paper:pumpkin pie, whisper white, garden green, yo-yo yellow,
other: stampin' pastels, sponges, pumpkin pie grosgrain ribbon.
Tuesday, May 25, 2010
Kraft Flowers
I love the Kraft cardstock! It's so easy to use and makes a quick and pretty card. For this card, I stamped right on the kraft card stock with Soft suede and whisper white. Hint: make sure you allow time for the white to dry since it's a slower-drying ink...you don't want to smear it! Then I simply added a sentiment on the top and a ribbon across the center-- for ribbon I used the 5/8 inch satin ribbon in certainly celery-- love this stuff! Then I stamped a flower on white, cut it out and added it on with a dimensional. What a pretty card without using a ton of supplies!
stamps: Fifth Avenue Floral
ink: soft suede, whisper white
paper: kraft, whisper white
other: 5/8" satin ribbon, dimensional
stamps: Fifth Avenue Floral
ink: soft suede, whisper white
paper: kraft, whisper white
other: 5/8" satin ribbon, dimensional
Monday, May 24, 2010
Beautiful Brayer Card
Here is a beautiful card I made at my upline event last friday! One of the best parts about being a demonstrator is getting together with other demonstrators and sharing ideas- I always learn something new!
To make this card you start with glossy white card stock. Then stamp the butterfly using versamark ink (this butterfly is from the hostess set Punched Posies). Then cover up half the card and use an inked brayer to roll over the uncovered half. Then switch which half is covered and brayer over the other side using a different color. This card uses Crushed Curry and Dusty Durango. Isn't that neat? Where the versamark was stamped, the cardstock resists the ink.
To finish off the card, we stamped the flowers and punched them out, adhering them on the card with dimensionals. Then a sentiment on the bottom, thank you from the set Teeny Tiny Wishes.
stamps: Punched Posies, Teeny Tiny Wishes
ink:dusty durango, crushed curry, versamark
paper: dusty durango, crushed curry, whisper white, glossy white
other: brayers, polka dot ribbon in dusty durango, XL flower punch, 5 petal flower punch, modern label punch
Sunday, May 23, 2010
Ice Cream Card
It's a beautiful day today - Warm and sunny - FINALLY! So I thought I'd share with you a cute little summery card I made with the new set Sweet Scoops. The cone is stamped with Soft Suede ink. I stamped the ice cream top by inking it with Pretty in Pink ink and then rolling the edges on the melon mambo ink pad. This technique is called "rock and roll" and makes a cool two-tone image. You could also do this with markers. Just make sure that you always go from light to dark. You don't want to do the dark color first and then have it mess up your lighter colored ink pad or marker! To finish the ice cream cone I stamped a cherry on the top.
Then to make it into a card I framed it with some melon mambo card stock and tied a pink taffeta ribbon along the bottom. The sentiment "sweet" is actually from the sentiment included with the Sweet Scoops set. It says "Have a sweet celebration" but I just inked the word sweet with a marker and stamped it. Then I punched it with the tab punch.
The last thing I used on this card was a piece of patterned paper. I used a piece from the Razzleberry Lemonade pack that I punched the edge with using Eyelet border punch!
Sweet and simple :)
Tuesday, May 18, 2010
Flower folds pin
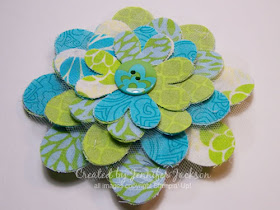
Check out this cool flower pin I made using the Flower Folds Big Shot die! Isn't it pretty. I made this for a friend for her birthday. She loves these colors so when I saw this fabric I knew it would be perfect. I cut out the 4 different fabrics with the Flower folds die and also some netting. Then I glued and layered them to make the pin. I finished it by adding a button on the top.
Here's another picture:
Then I added a pin on the back with a glue gun. This would be great wear or to pin on a bag or purse. I hope you like it!
Here's another picture:
Then I added a pin on the back with a glue gun. This would be great wear or to pin on a bag or purse. I hope you like it!
Saturday, May 8, 2010
Cool Bitty Buttons!
I was so excited when I saw the cool Bitty Buttons in the Summer mini - these are so awesome. The buttons are clear and the coordinate with the punch pack (a pack of three mini punches) and the Itty Bitty Bits Stamp set. First you stamp your image of choice from the Itty Bitty Bits Stamp Set and then punch it out with one of the punches. Then you can layer it with a button. They are all sized to work together-- how cool is that!
Here's a close-up:
It's so much fun making custom buttons! Let me know if you'd like to try it -- Attend my next class or contact me to order!
stamps: Tropical Party, Heard from the heart, Itty Bitty Bits
ink: crushed curry, melon mambo, soft suede
paper: whisper white, soft suede, melon mambo, certainly celery
other: Big Shot texturz Plate, Paper piercing, Bitty Buttons
Tropical Birthday
Happy May! I'm so excited about all the fun new stuff in the Summer Mini Catalog! One of my favorite new stamps sets is Tropical Party, which I used to make this card. I stamped the images in melon mambo, crushed curry and certainly celery ink. Then I used a piece of soft suede card stock that was textured using the wood grain texture plate from the Texture Plate Kit #4 in the Big Shot. The main image was punched out with the scallop square punch and then layered on top of some melon mambo and crushed curry card stock. Then add some polka-dot ribbon and the sentiment "Happy Birthday" from the stamp set A Little Birthday Cheer.... now off to make some more cards with the summer mini stuff!