Tuesday, December 22, 2009

Gift card...

What? It's only 3 days 'til Christmas?? How did that happen?

If you're like me, you're still finishing up the last-minute shopping, baking and gift making....yikes!

I've been so crazy making projects, I haven't had time to post them....plus, I don't want to spoil anyones surprise by posting their gift early since a few of my family members and friends do read my blog occassionally ;)

So you can look forward to seeing what I made everyone for christmas soon but for now here's a last-minute gift card holder! This is pretty easy to make and looks very professional.

You start with a piece of card stock that's 4-1/4" x 11" and score it at 3", 5 1/2" and 8" on the long side. Then stamp all over that piece if you want a pattern on it. Make sure you stamp both sides. I used the poinsettia from the Season of Joy stamp set and stamped it with Real Red ink.

Next, you fold it on all the score lines and assemble it to look like this photo. Note: Make sure you don't put adhesive on the innermost fold. Just put your adhesive on the outside edges or your pocket will end up glued shut and you won't have any place to put your card.


Once your piece is assembled, use the Word Window punch to make the opening in the middle for your card to go in. I punched it once in the middle, then carefully lined it up and extended the punch once on each side so that the opening is wide enough. To make the circle notch in the center I used the 1/2" circle punch.

Decorate or stamp a sentiment on the inside if you'd like. I used the "holly jolly" stamp from the Christmas Punch hostess stamp set and punched it out with the Curly Label punch.

Then Decorate the front as you like I used the big square word stamp from Season of Joy again and framed it with a piece of Garden Green Card stock. Cut a wrap from decorative paper that is around 1"wide by 7.5" long. Then attach your front piece to the center of your wrap. Wrap it around your gift card holder and glue it together on the back. Make sure you don't glue it to the holder so that the recipient can easily slide it off and get to that gift card faster!!

Hope you enjoyed the directions for this. Here's a final photo of the front all assembled:

Happy Holidays!!

Thursday, December 17, 2009

Glass Etching on Candle Holder...

Here is a simple and really cool gift to make. I found this cool square glass candle holder and knew I had to make it into something. I've always wanted to try glass etching so this was the perfect opportunity. I cut out a snowflake shape out of contact paper using the Big Shot and the Sizzlit Snowflakes Die. I stuck it all onto the front of the glass (both the positive and negative shape). Then peel out the snowflake shape, leaving all the rest so you're left with the outside negative shape stuck on. The etching cream will etch whatever is NOT covered so that's why you need to do the negative shape. Make sense? Then you just follow the directions on the etching cream bottle. Mine had me cover it with a thick layer (wearing gloves), wait 5 min and then rinse off.... and ta dah..... it's etched. Cool, huh?

Hope you enjoy trying some of your own....I want to make some wine glasses next!

Tuesday, December 15, 2009

Snowflake Cube - 2 ways

I've been so busy lately doing projects lately I haven't had much time to blog! I just started making my Christmas cards (all 60) this week... You'd think that I'd learn to start earlier but every year it is the same last minute rush to the holidays!

Here's a gift I made that was quick and easy. It's a glass cube that I bought at a local craft store. It has a hole on the top (or bottom, depending on how you turn it) so it's perfect for filling. I made one of these this summer for a birthday gift (check out this post) and thought that it would be fun to do a holiday one.

To decorate the cube, I used the snowflake die, Snowflake #2, and cut it out using a piece of white décor elements vinyl with my Big Shot. I love how you can get the vinyl in sheets and make your own die cuts using any Big Shot die! Plus, they just added a whole bunch of new colors that are on sale now!

I attached the snowflake to the cube and filled it with Hershey Kisses and then tied it up with some thick Striped Grosgrain ribbon. Isn't it pretty?


Then when the chocolate is gone, you can turn the cube around so the hole is at the bottom and fill it with a small string of lights. Here's how that looks. I didn't realize that the lights I bought were on a green string...a white one would have looked better but it still looks pretty.

Thursday, December 10, 2009

One-layer Christmas Card

Wow. We had a ton of snow this week. It took my husband and I around 4 hours to clean out our driveway and sidewalk. I think it was around 18 inches of heavy wet snow, more where the plow pushed it in at the ends!

Here's a super easy Christmas Card for those of you making last-minute cards. It only uses one layer of card stock! I used whisper white card stock for mine. I cut a piece of paper using the top note die using a scrap paper (doesn't matter what color) and used it as a stencil. Hold it down onto the white card stock and sponge along the edges with blue to create that cool shape. Then leave your template there and stamp some snowflakes on top using the Serene Snowflakes set. I Left room on the bottom for my sentiment "Merry Christmas" from the Many Merry Messages stamp set.

This card is quick and easy but looks fantastic!

Tuesday, December 8, 2009

It's snowing!

Since it's snowing today I thought I'd upload some snowflake cards! This is a card I made for a workshop I had last month but haven't had a chance to post yet. I used night of navy card stock for the base and the Platinum shimmer paint to get the shimmery effect on the card stock. To get this fun sparkly/splattery effect, I mixed a bit of the platinum shimmer paint in a mini spray bottle with some rubbing alcohol. I didn't use any special ratio, just added it and tested on a strip of paper until it looked sparkly enough! Then I sprayed it on the night of navy paper and let dry for a few minutes before making my card. I think it looks really pretty on the dark paper. Then I stamped the large snowflake from Serene Snowflakes using a sponge to apply the paint directly to the Stamp. I framed the image with a piece of Brushed Silver Cardstock. Then I stamped "sparkle" from the stamp set Warm Words using the same method of sponging the paint directly onto the stamp and then stamping it. Then I finished it off with some silver cord! Love all the sparkles on this.

Here's another card I made using the platinum shimmer paint. This time I used Brocade blue cardstock and ran it through my Big Shot using the Movers & Shapers Die to create the window. Then I stamped Snowflakes around the front using the Serene Snowflakes stamp set again. The Sentiment "Seasons Greetings" is from the Many Merry Messages stamp set. To add shimmer paint, i just used a sponge to smear it along th edeges. It looks really pretty in person! Then I put a piece of white cardstock on the inside and stamped a small snowflake on it. Hope you are having a nice snowy day!

Monday, November 30, 2009

Penguins!

Here are some great cards made with penguin from the Cold & Cuddly Stamp set! I just love the little penguin in this set. He's so adorable and round! The first card I made by sending red cardstock through my Big Shot using the Movers & Shapers die to cut out the cute little window. Then I used the big shot again, this time with the Petals-a-Plenty embossing folder to make the cool embossed pattern on the old olive paper. Then I stamped the penguin on some white cardstock and put him on the inside of the card so he shows through the window...and added the little sentiment "Here's some love to keep you warm". Of course, I had to add a little white grosgrain ribbon to finish it off.

Here's another card using this same set, Cold & Cuddly. These little guys are stacked up high! I like how the top one looks like he's jumping off the stack! I used the stamp-a-ma-jig to line them up just right. This tool is great for lining up images! Then I framed them with some not quite navy cardstock. I also used the same embossing folder as the previous card but used bashful blue paper this time. The base of the card is Elegant Eggplant Cardstock.

I love how you can make cards feel so different just by using different colors with the same stamp set! This card wouldn't have to be a Christmas card at all-- you could send it to anyone this winter!

Sunday, November 29, 2009

Glitter Ornament...


Here's an ornament I made using Glitter and re-inkers. This will be part of my Gift Class on Dec. 5th. Let me know if you'd like to attend and make one. You start with a clear ball and end up with this beautiful glittery one. I also added on a snowflake that I cut out with my big shot to add something to it. Isn't it pretty? I also made a gift box that the ornament fits in. Here's a photo of the box:

I made this using the Designer paper for the lid and the Christmas Punch stamp set to make the tag. Let me know if you'd like to attend my class!

Saturday, November 28, 2009

Bear Love


I just love this bear from the Cold & Cuddly Stamp set. He's so cute! For this card I used him on the iceberg and gave him a cup of coffee and a hat to keep him warm. It's hard to see the sentiment in the photo but it says "here's some love to keep you warm." This would be a great card to send someone over the holidays and make them feel special. I love using the real red with the soft suede ....it really makes a beautiful color combo. The snowflakes on the background of the card are stamped with from the Berry Christmas stamp set.

stamps:Cold & Cuddly, Berry Christmas
ink: Soft Suede, Chocolate Chip, Real Red
paper: Soft Suede, Very Vanilla, Real Red
other: polka dot soft suede ribbon, dimensional dots

Friday, November 27, 2009

Leaf Card..


Here is a card using the set, Autumn Splendor. I wasn't going to order this set but I've seen so many beautiful cards with it I couldn't resist.I made this one by inking the leaves with a markers so that I could make them two-toned. I used bravo burgundy and rose red on some and pumpkin pie and really rust on the other ones. Then I framed it with a piece of leftover Cast-A-Spell designer paper that I punched a scalloped edge on and added some soft suede polka-dotted ribbon. The sentiment is from the Sincere Salutations set. Hope you are enjoying the holiday weekend!

stamps:Autumn Splendor, Sincere Salutations.
ink: close to cocoa, bravo burgundy, rose red, pumpkin pie, really rust
paper:soft suede, whisper white, Cast-a-spell designer paper
other: polka-dot soft suede

Thursday, November 26, 2009

Happy Thanksgiving!


Happy Thanksgiving!!
I hope everyone has a great Thanksgiving! I made these cute little turkeys to make the table festive! I got my inspiration a blog post by Kimberley Morris here. These are easy to make, you just need some cardstock, scallop punch and some Hershey Nuggets. I made mine a little different than hers but I love how they turned out. Instead of a circle for the front, I punched out a scallop and then cut it to look like a turkey body.

Here's a close-up of mine:


stamps: none
ink: none
paper: soft suede, pumpkin pie, crushed curry, polka dot designer paper, real red
other: hershey nugget, google eyes, scallop punch, flower punch (for beak and waddle)

Wednesday, November 25, 2009

Medallion Coasters...


Hope everyone is getting ready for a great Thanksgiving day with family. I know I'm really looking forward to visiting with mine! We're supposed to get a snow/rain storm so make sure you travel safely if you live in the Midwest!

Today I'm sharing another project for my holiday class. My attendees will have the option of making some really cool tile coasters. To make mine I used the Medallion stamp set. This is so quick and easy and looks so professional when it's done! You could also use a different stamp set and color in the image with chalks... I've done that before and it also turns out beautiful. These are such a great gift idea! Make sure if you make these that you add little felt or cork feet so your recipient doesn't scratch their table!!

Tuesday, November 24, 2009

Glitter Window Card

Here's a card using a neat technique where you make a glitter window. To make a card like this you need some sort of window. On this one, I used the Big Shot Movers & Shapers Dies Holiday Windows to create the Christmas bulb window. to make it glittery, I used a piece of packing tape and attached it with the non-sticky side facing the front of the card, then dumped glitter over the sticky side. Here's a close-up:

Then I attached some patterned paper behind it. It creates a fun, sparkly effect. For this card I used Christmas Cocoa Specialty paper. The sentiment is from the Heard from the Heart Stamp set.

stamps: Heard from the heart
ink: Soft Suede
paper: Real Red, Soft Suede, Christmas cocoa specialty paper, whisper white
other: Movers and Shapers Holiday Windows die, Big Shot, Gold Cord, Glitter, packing tape, Scallop border punch.

Monday, November 23, 2009

One Week Sale!!

Just Announced from Stampin' Up! For one week only--you get amazing discounts--on over 40 products and product bundles! See below for complete offering.

Sale good through Monday, November 30, 2009 - Contact me to place an order!

Item

Description

Regular Price

Discounted Price

120280

Framed with Love Bundle
Framed with Love stamp set
Full Heart punch

$43.90

$21.95

120281

Thank You Kindly Bundle
Thank You Kindly stamp set

Scallop Edge punch

$29.90

$14.95

120976

Thank You Kindly Bundle (French)

  • Tous mes remerciements stamp set
  • Scallop Edge punch

$29.90

$14.95

120282

Animal Crackers Bundle

  • Animal Crackers stamp set
  • Star Designer brads

$25.90

$12.95

120283

Corduroy Button Bundle

  • Kraft Corduroy buttons
  • Pumpkin Pie Corduroy buttons
  • Summer Sun Corduroy buttons
  • Basic Gray Corduroy buttons
  • Chocolate Chip Corduroy buttons

$49.75

$24.88

120284

Game Night Bundle

  • Card Games stamp set
  • Game Night stamp set

$40.90

$20.45

120285

Four Square Bundle

  • Four Square stamp set
  • Scallop Square punch

$30.90

$15.45

120286

Heart to Heart Bundle

  • Love You Much stamp set
  • Heart to Heart punch
  • Pretty in Pink 1/2" striped grosgrain ribbon

$49.85

$24.93

120310

Heart to Heart Bundle (Spanish)

  • Te Quiero Mucho stamp set
  • Heart to Heart punch
  • Pretty in Pink 1/2" striped grosgrain ribbon

$49.85

$24.93

120311

Heart to Heart Bundle (French)

  • J't'aime beaucoup stamp set
  • Heart to Heart punch
  • Pretty in Pink 1/2" striped grosgrain ribbon

$49.85

$24.93

120287

Chipboard Letter Bundle

  • On Board Timeless Type
  • On Board Loads of Letters

$25.90

$12.95

120288

Double-Stitched Ribbon Bundle

  • Bashful Blue 1" double-stitched grosgrain ribbon
  • Rose Red 1" double-stitched grosgrain ribbon

$17.90

$10.74

120289

Ultimate Stampers' Starter Bundle*

  • Best Wishes & More stamp set
  • Eight Great Greetings stamp set
  • On a Pedestal stamp set
  • Earth Elements Stampin' Spots
  • Earth Elements assorted card stock (8-1/2" x 11")
  • Whisper White card stock (8-1/2" x 11")
  • Old Olive 1/2" striped grosgrain ribbon
  • Flower Designer brads

$127.70

$76.62

120290

Build-A-Brad Bundle

  • Calendar Alphabet stamp set
  • Pewter Build-A-Brad
  • Antique Brass Build-A-Brad

$40.85

$24.51

120291

Enjoy Every Moment Bundle

  • Enjoy Every Moment stamp set
  • Circle Designer brads
  • Flower Designer brads

$43.85

$26.31

120312

Enjoy Every Moment Bundle (French)

  • Profiter de chaque instant stamp set
  • Circle Designer brads
  • Flower Designer brads

$43.85

$26.31

120292

Cheep Talk Bundle

  • Cheep Talk stamp set
  • Note cards
  • Pumpkin Pie Corduroy buttons

$42.85

$25.71

120293

Sock Monkey Bundle

  • Sock Monkey stamp set
  • Sock Monkey Accessories stamp set
  • Chocolate Chip Corduroy buttons

$58.85

$35.31

120313

Sock Monkey Bundle (French)

  • Sing-chaussette stamp set
  • Sock Monkey Accessories stamp set
  • Chocolate Chip Corduroy buttons

$58.85

$35.31

120294

Alphabet Bundle

  • Jayne's Type Alphabet stamp set
  • Lovely Letters stamp set

$87.90

$52.74

120295

Simply Said Bundle

  • Simply Said stamp set
  • Old Olive 1/2" striped grosgrain ribbon
  • Full Heart punch

$52.85

$31.71

120314

Simply Said Bundle (French)

  • Amitié stamp set
  • Old Olive 1/2" striped grosgrain ribbon
  • Full Heart punch

$52.85

$31.71

120296

On Board Bundle

  • On Board So Tweet
  • On Board Batch of Blooms
  • On Board Essentials

$42.85

$25.71

120927

Christmas Décor Bundle #1

  • Holly Berry Wreath Décor Elements (Kraft, Real Red)
  • Real Red Vintage Ornaments Décor Elements
  • Chocolate Vintage Ornaments Décor Elements

$74.85

$44.91

120298

Christmas Décor Bundle #2

  • Holly Beary Wreath Décor Elements (Chocolate, Real Red)
  • Real Red Vintage Ornaments Décor Elements
  • Chocolate Vintage Ornaments Décor Elements

$74.85

$44.91

120299

Christmas Décor Bundle #3

  • Holly Berry Wreath Décor Elements (Old Olive, Real Red)
  • Real Red Vintage Ornaments Décor Elements
  • Chocolate Vintage Ornaments Décor Elements

$74.85

$44.91

120300

For All You Do Bundle

  • For All You Do stamp set
  • 5/16" Neutrals Jumbo brads

$36.90

$25.83

120315

For All You Do Bundle (French)

  • Merci pour tout stamp set
  • 5/16" Neutrals Jumbo brads

$36.90

$25.83

120316

For All You Do Bundle (Spanish)

  • Por todo lo que haces stamp set
  • 5/16" Neutrals Jumbo brads

$36.90

$25.83

120301

Striped Ribbon Bundle

  • Bashful Blue 1/2" striped grosgrain ribbon
  • Pumpkin Pie 1/2" striped grosgrain ribbon
  • Old Olive 1/2" striped grosgrain ribbon
  • Pretty in Pink 1/2" striped grosgrain ribbon
  • So Saffron 1/2" striped grosgrain ribbon
  • Real Red 1/2" striped grosgrain ribbon

$47.73

$33.41

120302

Bling Bundle

  • Sticky Pages
  • Sticky Cuts Sweet
  • Fine Supernova Stampin' Glitter
  • Fine Galaxy Stampin' Glitter

$43.80

$30.66

120303

Fresh-Cut Bundle

  • Fresh Cuts stamp set
  • Fresh-Cut Notes
  • 5/8" Neutrals Jumbo brads

$37.85

$26.50

120317

Fresh-Cut Bundle (French)

  • Fraicheur exuise stamp set
  • Fresh-Cut Notes
  • 5/8" Neutrals Jumbo brads

$37.85

$26.50

120304

Pendant Note Bundle

  • Pendant Park stamp set
  • Pendant notes
  • 5/8" Neutrals Jumbo brads

$39.85

$27.90

120318

Pendant Note Bundle (French)

  • Adorable parc stamp set
  • Pendant notes
  • 5/8" Neutrals Jumbo brads

$39.85

$27.90

120319

Pendant Note Bundle (Spanish)

  • Un dia en el parque stamp set
  • Pendant notes
  • 5/8" Neutrals Jumbo brads

$39.85

$27.90

120305

Sporting Bundle #1

  • Large Night of Navy Sporting Décor Elements
  • Night of Navy Just Sports Décor Elements

$67.90

$47.54

120306

Sporting Bundle #2

  • Large Chocolate Sporting Décor Elements
  • Chocolate Just Sports Décor Elements

$67.90

$47.54

120307

Sporting Bundle #3

  • Large Black Sporting Décor Elements
  • Black Just Sports Décor Elements

$67.90

$47.54

114864

Ginormous Flowers I Décor Elements

$39.95

$27.97

114863

Ginormous Flowers II Décor Elements

$39.95

$27.97

112534

5/16" Neutrals Jumbo brads

$7.95

$5.57

112533

5/8" Neutrals Jumbo brads

$6.95

$4.87

112081

Scallop Square punch

$15.95

$11.17

113693

Full Heart punch

$15.95

$11.17

113694

Heart to Heart punch

$15.95

$11.17

112091

Scallop Edge punch

$15.95

$11.17

112571

Circle Designer brads

$5.95

$4.17

112579

Flower Designer brads

$5.95

$4.17

112572

Star Designer brads

$5.95

$4.17

114785

Small Wonderful Flowers Décor Elements

$39.95

$27.97

114786

Medium Wonderful Flowers Décor Elements

$69.95

$48.97

114791

Small Wonderful Leaves Décor Elements

$39.95

$27.97

114792

Medium Wonderful Leaves Décor Elements

$64.95

$45.47

*This bundle is only available while supplies last.

Friday, November 20, 2009

Holly Jolly Christmas!

I've been a little behind on blogging lately because I've been frantically working on Holiday ideas and projects for my upcoming Holiday gift class. Here is one of the projects I'll be offering. This is a magnet made from a domino using the hostess set Snow Buddies. Check out the cool sparkly edges. This little guy is even cuter in person. I was really happy with how he turned out! He comes complete with a little gift box made using the Matchbox Big Shot die. The Holly Jolly Sentiment is from another hostess set, Christmas Punch.

Make sure to let me know if you'd like to learn how to make this and join me for my class on Dec. 5th.

Tuesday, November 17, 2009

Berry Christmas Wreath


Here is a card using the Berry Christmas stamp set. I think this is my favorite color combo for the holidays this year...Real Red, Old Olive and Soft Suede. I just love how these work together. I used the wreath from the Berry Christmas set and stamped it in old olive and then stamped it again, turning the stamp slightly to give it that two-tone look. The berries, bird and ribbon are also all from this set. It's neat how you can build little scenes quickly using all the pieces! Then for the card, I chose an old olive base and took a piece of real red and using the Petals-a-Plenty embossing folder in my big shot to make the texture on it. The embossing folders for the Big Shot leave such a crisp image because the paper is sandwiched between the two layers of plastic when it goes through the Big Shot and it creates a really deep impression.

stamps: Berry Christmas
ink:Old Olive, Soft Suede, Real red
paper: Old olive, soft suede, real red, whisper white
other: petals-a-plenty embossing folder, big shot

Monday, November 16, 2009

Medallion for the holidays...

When I first say this giant Medallion stamp, I immediately thought it would make great holiday cards .... (or wedding cards, or thank you cards, or just about anything). It's so elegant looking and it makes a beautiful card fast. For this card I used one of my new favorite color combos, real red and soft suede to create this gorgeous card. I stamped the medallion image on white, going off the edge of the paper so I would have room for a sentiment on the bottom. Then I used the Season's Greetings sentiment from the stamp set Many Merry Messages and stamped that in suede along the bottom. Then add a bit of white taffeta ribbon and a rhinestone brad and---tah dah!--- a simple and beautiful card!

stamps: Medallion, Many Merry Messages
ink:real red, soft suede
paper:real red, soft suede, whisper white
other:fire rhinestone brad, white taffeta ribbon

Friday, November 13, 2009

Make Merry Card


Here is a quick and easy Christmas card using the set Berry Christmas. This set is simple and quick and you can build lots of fun images with it. I used Real Red card stock for the base. Nothing screams Christmas to me like Real Red and I love to pair it with Old Olive. I stamped some poinsettias on the background with real red ink and then stamped my main image on white. I used the stem with the holly on the end and the cute little bird. Then I added the berries. The Sentiment "make merry" is also from this set. I added it to card using some old olive card stock and some real red ribbon. Simple, easy and very holiday!

New Header...

Check out my new blog header! I created it using the My Digital Studio Software from Stampin' Up! I'm excited to play with this more. I just installed it on my computer last night and think there's going to be a ton of fun stuff to do with it!!

What do you think? Not bad for just playing with it for an hour or so, huh?

Monday, November 9, 2009

Bearly a holiday card...

I love this little bear...isn't he so cute? He's from the set Cold & Cuddly that is in the Holiday mini catalog. This set is a lot of fun because there's all kind of things you can build with it. There's several hats and different things you can use to make little scenes with the animals. For this card, I wanted to make a holiday card without using red and green and I reached for my Burmuda Bay Cardstock. This turned out great with the night of navy. I stamped the iceberg in navy and then stamped the bear on a separate piece with Burmuda Bay ink and a melon mambo pink nose. I cut him out so I could have him pop off the card and attached him with a pop dot. Then I stamped the little fishing pole so it looks like he's fishing. I used a snowflake from the Berry Christmas set to stamp the snowflake background and finished it off with a saying from Heard from the Heart. I used the "May all your wishes come true" sentiment so that it could also be a winter birthday card!


Stamps: Cold & Cuddly, Heard from the Heart, Berry Christmas
ink: Night of Navy, Burmuda Bay, Melon Mambo
paper: Whisper White, Night of Navy, Burmuda Bay
other: dimensionals

Friday, November 6, 2009

Serene Snowflakes

I'm not ready for real snow yet but I am having lots of fun with this set. Here is super pretty and simple card made with the Serene Snowflakes set. I love this color combo of Bashful Blue, Not Quite Navy and Soft Suede. Doesn't it just look soft and pretty? I Used the biggest snowflake from the set to create the main focal image and then used some of the smaller ones on a piece of soft suede cardstock to create a pattern for the left side. The sentiment "Happy Holidays" is from the set Many Merry Messages.

stamps: Serene Snowflakes, Many Merry Messages
ink: Not Quite Navy, Soft Suede
paper: Not quite navy, soft suede, bashful blue, whisper white
other: polka-dotted grosgrain in soft suede

Thursday, November 5, 2009

Snowflake Card!


Hello! Sorry I haven't posted in a bit...I've been transitioning from Halloween stuff into Christmas stuff so I'm little bit behind on posting! I just had a Holiday Stamp - a-Stack last week so that was keeping me busy...but I do have a bunch of fun stuff to start sharing so stay tuned. Here is a fun and super simple Holiday card. I used the Serene Snowflakes stamp set with Real Red and Old Olive (Love that color combo for christmas) to stamp the snowflakes. Then I framed it with a piece of Old Olive that I used the Scallop border punch on. Then Simply add a Sentiment on the bottom (mine is from the set Many Merry Messages). Easy and so pretty. Here is another verison of the same card--just using different colors:

I used Soft Suede and Bashful blue for this version. Isn't it cool how different you can make a card look just by changing the colors?

Friday, October 30, 2009

Owlie!


I made these a while back but realized I never posted an image!! Here is my little owl friend! Isn't he adorable? I saw a bunch of these different places online and was inspired to make my own. He's super easy to make. For his head I just cut out a Top Note die shape using my Big Shot and chocolate chip cardstock. Then fold it in half to make the head. For the eyes I used circle punches in 3 sizes and crushed curry, whisper white and basic black cardstock. For the nose, I punched a star out of pumpkin pie cardstock and cut off one side. EASY! and adorable....then attach it to a cello bag filled with your favorite Halloween treat! These were a big hit at my Halloween class! Hope you all have your costumes ready for tomorrow!!

Thursday, October 29, 2009

Little Boo Slider

Here's a cute little box I made using the Matchbox die. I love this die. It's so much fun to make little boxes. For this box, I decided to use the Cast-A-Spell designer paper. It's super easy to run your paper through the Big shot and then fold up the box. For the bottom of the box I used pumpkin pie cardstock. To decorate it, I stamped Little Boo in pumpkin pie ink and punched him out with a circle punch and then framed him with a scallop circle punch. I also punched each of the bumps in the scallop using a tiny circle punch. Then I attached it to the top with a dimensional and added some pumpkin pie grosgrain ribbon.

Here's what's inside:


I put little Hersheys nuggets inside. Six of these fit perfectly and look super cute when wrapped in designer paper. The thick ribbon works great as a pull to open it up!

thanks for looking!

stamps: Little Boo
ink:pumpkin pie, whisper white, basic black
paper:Cast-a-Spell Designer paper, pumpkin pie
other:grosgrain ribbon, dimensional, punches, thick stripe ribbon in pumpkin pie

Tuesday, October 27, 2009

Deal of the week!


Don't miss this weeks deals of the week! Good through October 31, 11:50 PM (MT). These would be great for planning a party for a little girl or boy!! Check it out and contact me if you'd like to order!!

tem

Page

Description

Regular Price

Special Price

116214

174

Princess Party Kit

$15.95

$9.99

116213

175

Pirate Party Kit

$15.95

$9.99

Monday, October 26, 2009

Skeleton Lollipop!

Only a few days left until Halloween!! Here's another cute little treat I made. These are super easy. It's just a piece of designer paper folded in half. Make these just a little wider and longer than your lollipop, my piece was around 3" x 6", folded to 3" x 3". Then you punch a little hole at the fold to put the stick in. For lollipops I used flat ones that had pumpkins on them, you want to use a flat lollipop if you can. For the image, I used the set Twick or Treat. I love the funny little sentiments on the stamps in this set. I colored it really simply, just colored the dog and gave the skeleton a little grey shadow. Then I framed it with a piece of pumpkin pie and adhered it to the front of the lollipop. To finish it off, a piece of that awesome thick striped ribbon! These are super easy to make so I made a bunch!!

stamps:Twick or Treat
ink:Black, creamy caramel, grey
paper: whisper white, pumpkin pie, Cast-a-Spell Designer Paper
other: Lollipops, Thick striped Grosgrain in pumpkin pie and black, hole punches

Thursday, October 22, 2009

Sweet Treat Bucket

Only a week until Halloween!! Here's what I had as Hostess gifts for my fabulous hostesses this month. I had these cute pails that I thought would be perfect for a little lollipop bouquet. I put some foam blocks into the bottom so I would have something to stick the them into and then I decorated some flat lollipops by stamping images from the set Batty for You and punching them out with a circle punch and layering them with punched out scallops. Aren't they cute? Then the big square in the back is using the Sweet Centers stamp set and a sweet treat cup filled with reeses pieces...yum! Then to finish it off I used some shredded paper (found in the wrapping section) to cover up the foam.

I also did a couple mini versions that I gave away as door prizes. They're mini buckets that are only a few inches tall and so adorable! These were made just the same way except I only used 3 lollipops to fill them.


stamps: Batty for you, Sweet Centers
ink: pumpkin pie, black, old olive, perfect plum markers
paper: pumpkin pie, black, old olive
other: Buckets, Thick stripe Grosgrain ribbon, lollipops, circle punch, scallop circle punch, candy, foam, shredded paper.

Tuesday, October 20, 2009

Spooky Skull Card


Here is another one of my Halloween card creations. I love the effect of embossing a solid image on a patterned paper background so I did that again here. The paper is a subtle black print from the Cast-A-Spell Designer paper pack and I embossed a white skull image from the stamp set From the Crypt. I mounted this on a piece of black. For the rest of the card I wanted to do a little bit different color scheme so this time I used purple (elegant eggplant) for the card base. I cut out a shape with the Top Note big shot die and then cut it in half and just used half of it. This creates a really neat shape. To finish I used some more paper from the Cast-A-Spell pack and some black grosgrain ribbon. The sentiment "spooky" is from the set Halloween Frights.

Stamps: From the Crypt, Halloween Frights
Paper: Cast-a-Spell Designer paper, Elegant Eggplant, Basic Black, Old Olive
Ink: Black, Versamark
other: black grosgrain ribbon, top note big shot die, White embossing powder, heat gun

Monday, October 19, 2009

Faux Metal Spider!


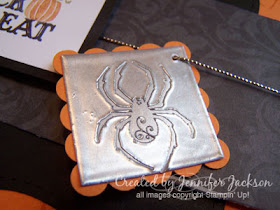
Here is a cool card I made for Halloween using the Faux Metal technique to create the spider. I used a small square and covered it with Versamark ink and then covered it with silver embossing powder and heated. Once the first layer of powder is melted and smooth you need to add more while it's still warm and heat again. I think I had to do this about 3 times to get it thick enough. Then while it's still warm, you quickly press your stamp into it it and it makes an impression in the silver. I used the spider from the From the Crypt stamp set. Doesn't it look just like metal? Here's a close-up:


Then I mounted it on a scalloped square and punched a hole through it to make it into a tag! Isn't that the coolest? I love how it turned out!! Then of course, I finished my card using some Cast-a-spell designer paper and my favorite top note big shot die!!

stamps: From the Crypt, Holiday Best (hostess set)
ink: pumpkin pie, basic black
paper: pumpkin pie, basic black, whisper white, Cast-a-Spell Designer paper
other: Silver embossing powder, heat gun, square punch, scallop square punch, top note big shot die, Silver cord

New Deals of the week!

The third deals of the week are from now through October 26, 9:50 AM (MT). These embellishments would be great for holiday cards! Contact me to order!

Item


Description

Regular Price

Special Price

114348

Basic Jumbo grommets

$6.95

$4.49

109857

Mini Library clips

$12.95

$8.99

112571

Circle Designer brads

$5.95

$3.99

112581

1/2" Library clips

$6.95

$3.99

Friday, October 16, 2009

Vampire Box!


Remember the Frankie box I made just a little bit ago? (Check out this post here) Well, I thought it would be fun to do one that looked like a vampire... so here he is. I made him the same way as Frankie, using two cut-outs made with the Top Note Big Shot Die, this time cut out of going gray card stock. I also cut one out of black and used the 1 3/4" circle punch to cut two circles out to create the hairline... then I used various sizes of circle punch to make the eyes, just like Frankies, but red and black. The mouth was made using two different sized oval punches and then cutting them in half. The teeth are made by punching a circle and then punching it again to make a cresent moon shape, which I glued between the lip parts. The nose is an oval punch. To finish the look, I used a white gel pen to make dots in the eyes and sponged some of the edges with Chocolate chip ink. I also made a little box to go between the two shapes.

Here's a shot of the two guys together :
Thanks for looking--Hope you have a great weekend!

Wednesday, October 14, 2009

Spooky Candle!

Here is a really cool candle cover that I made this weekend. All the directions are from Jan Tinks blog post here where she made a video showing how to make this using the Movers & Shapers Big Shot die. She has some really cool stuff so check it out. Her sample was making a Christmas version but I decided it would be fun to do a spooky Halloween one.

I love the tree in this stamp set --House of Haunts-- It's so Creepy looking! I thought it would be perfect to make a spooky-looking window on this candle cover. I just stamped it in black on vellum. Then I used the scallop border punch to make a scalloped edge along the top. These are even cuter in person. I have a candle burning on the inside, can you tell? It's a tea-light in a little glass votive holder (make sure you put your candle in a holder so you don't burn down your house!) I think these would be great to have around the house for Halloween!

stamps:House of Haunts
ink: Basic Black
paper: vellum, basic black
other: Movers & Shapers Curly Label Big Shot Die, Orange Grosgrain ribbon, Scallop Punch, candle

Tuesday, October 13, 2009

Boo Box!

This weekend I had a lot of fun stamping just for the fun of it. So many times I'm working on projects for classes or for workshops and I have specific idea or product I want to feature so sometimes I forget how much fun it is to create stuff just for the sake of creating! I had a lot of fun and made some cool stuff that I'll be sharing with you this week!

The first project I made is this little clear pumpkin box. When I saw these cute little jelly pumpkins I had to buy them, knowing I could create a cute little treat container for them. So this weekend I thought, how could I use those pumpkins in a way you can see how cute they are?....and along came the idea of a clear box.

To make the box I used a sheet of acetate that was 8 1/4" x 3 1/2" that I scored just a little under every 2 inches along the long side. The top and bottom of the box are 3"x3" squares scored in at 1/2" on each side and then cut in to the 1/2" mark on two of the sides to create little flaps and folded up. I used Sticky Strip to hold it all together and then embellished it using the Cast-a-Spell Designer paper and the Little Boo Stamp. I also used the thick striped 1 1/4" Grosgrain ribbon and some hemp twine. I love all the texture ribbon adds.

Hope you like it!!

stamps: Little Boo
ink: Chocolate chip, pumpkin pie
Paper: Whisper White, Old Olive, Pumpkin Pie, Cast-A-Spell Designer paper
other: Scallop border punch, Acetate, 1" Circle punch, 1 1/4" Circle punch, Designer Label Punch, Hemp Twine, 1 1/4" Chocolate Chip Striped Grosgrain
, 1/8" circle punch