Thursday, November 29, 2012

Designer Paper Tile Coasters


I made a few sets of these coasters for my last craft fair, using up some designer papers! I love this retired paper design… I think It's called spice cake. 


 These aren't hard to make but do involve a bunch of steps so they take a few days from start to finish by the time you do it all!  To make these, I used mod podge to adhere the paper to the tiles. To make them water-resistant you will need to use a sealer as well. I used several coats of acrylic spray sealer, waiting for it to dry between coats. (I did this outside on my porch since it's very stinky). I also glued cork onto the bottoms so that they don't scratch your table!


For the craft fair I wanted to tie them together but wanted shoppers to know that they were all different designs so I created these cute tags that show the different patterns in each stack. That way, they know what they are getting. I love how these turned out!


Click here to order Stampin' Up Products Online from me!

Tuesday, November 27, 2012

Ornament Gift Card Holder


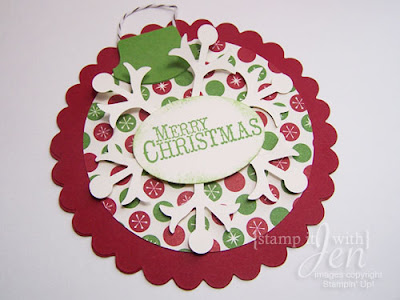
Need a cute gift card holder? This one is simply made with a few basic big shot dies! You need the Scallop Circle, 3 1/3" circle and Snowflake Flurry Bigz dies to make this. I simply cut out two big scallop circles from Cherry Cobbler Cardstock, a 3 1/3" circle from Designer Paper and a snowflake from white -- all using the big shot. Then I put it all together, adding a sentiment in the middle and making an ornament top using the round tab punch (retired) to hold the bakers twine. 

For the back side, cut your second scallop circle in half and glue it on to the back of the first one, just along the edges to make a pocket. I didn't have any gift cards lying around so this one is holding my Kohls 15% off coupon … he he he … but it's the same size as a gift card so you get the idea! 


stamps: Chock full of cheer
ink: Gumball Green
paper:  Whisper white, Cherry Cobbler, Gumball Green, Be of Good Cheer Designer paper pack
Big Shot: Scallop Circle Bigz Die, 3 1/3" circle Bigz Die, Snowflake Flurry Bigz  Die
other: bakers twine, circle punch, XL oval punch, round tab punch (retired)


Click here to order Stampin' Up Products Online from me!

Monday, November 26, 2012

Quick and easy tags


I love to make my holiday tags… I hate the sticker kind and like to tie mine on! 

Today I used  the two tags die to make some tags! It makes very cute tags - and they're simple to dress up. I did a quick and easy color scheme of Cherry Cobbler, white and crumb cake for these. I just stamped some mittens from the Chock full of Cheer stamp set and punched them out.. then framed them with punch outs using the scallop circle and decorative label punches. Add a to/from and some bakers twine and your'e done! 

I love to make my holiday tags… I hate the sticker kind and like to tie mine on! 

stamps: Chock full of cheer
ink: Cherry Cobbler, Early Espresso
paper:  Whisper white, Cherry Cobbler, Crumb Cake
Big Shot: Two Tags die
other: bakers twine, circle punch, scallop circle punch decorative labels punch


Click here to order Stampin' Up Products Online from me!

Saturday, November 24, 2012

Snowman mints treat


I made a bunch of these cuties to sell at the last craft fair I did. These are simple to make if you have the right punches.  You cover the peppermint patties with scalloped circles and then layer the snowman circles over the top. I didn't have small circle stamp and didn't want to glue on buttons for all of them so I used a new pencil with a fresh eraser top, using the eraser as a stamp. It's the perfect size! the nose is a point cut off from a punched star and the pink cheeks were created by adding on pink chalk with a q tip.  Then I put them in a skinny pretzel bag (found in the candy making  section at the local craft store) and tied the top with ribbon. The tag says "some of my best friends are flakes" and is from an old retired stamp set I had! 

I think he's just adorable!


Click here to order Stampin' Up Products Online from me!

Thursday, November 22, 2012

Happy Turkey Day!


Happy Thanksgiving!


I hope everyone is having a great day and spending time with family and friends!

Here is a blast from the past--- if you've been reading my blog for awhile,
you might remember these funny turkeys I made a couple years ago ;) Here is the original post.


Click here to order Stampin' Up Products Online from me!

Wednesday, November 21, 2012

Small gift bag


Here is another mini gift bag you could give little treats/gifts in. This one is only about 5 inches tall!  It's made using one sheet of card stock!  I made a similar box  a long time ago.. see post here.

For this one I stamped the paper with candy canes and then folded up to make the box. I stamped the mitten with lucky limeade on white and then framed it with some chocolate chip card stock. Isn't it super cute?

stamps: Chock full of cheer, Teeny Tiny Wishes
ink: Real Red, lucky limeade
paper:  Real Red, Soft Suede, Whisper white
other: Small hole punch, Lucky Limeade ruffled ribbon, Simply Scored Tool


Click here to order Stampin' Up Products Online from me!

Tuesday, November 20, 2012

Online Extravaganza!!


Check out my website this week for some great deals- products up to 50% off! 


Click here to order Stampin' Up Products Online from me!

Mini Gift Box


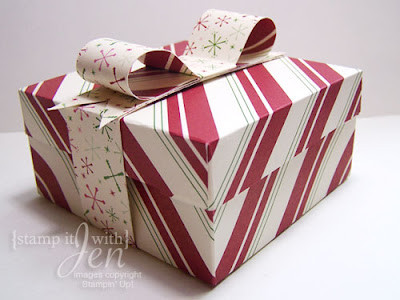
Here is a super sweet little gift box that is made from one sheet of 12 x 12 designer paper! I first noticed this cute box on another demonstrators website-Tanya Bell Bundaberg.  You can view a video tutorial on her site here.   I thought it was so cute that I couldn't wait to make my own!

paper: Be of Good Cheer Designer paper pack
other: Sticky strip,  Simply Scored Tool


Click here to order Stampin' Up Products Online from me!

Monday, November 19, 2012

Easy Holiday Gift Bag


I love little brown lunch sacks-- although I never use them for my lunch! There are so many cute things you can do with them and you can get a huge package of them at your local grocery store… usually for less than $2!

For this gift bag, I cut down the brown lunch sack to about 6 inches.  Then I cut a front and back piece  out of red card stock to 5.5 X 8.5. I used the XL oval punch to punch a handle in each side.  Note: You can't punch through 2 layers at once so punch one side then line it up to punch the other piece. 

Then decorate the front and back as you like and  glue them onto the bag.. .make sure you use a strong adhesive when attaching  the layers and when gluing to the bag (such as sticky strip or the glue in the green bottle)… you don't want your gift bag to fall apart! 

You can't see it really well in the photo , I rolled over the whole background using the music notes wheel stamp… I really should use rollers more often, they are so easy! Then I embossed the middle green layer with the Fancy Fan embossing folder on the big shot. The bird image is from the set Beautiful Season and so is the tag. I cut out the shape that the bird is stamped in with the Framelits Labels collection dies on the big shot. 

You can't put anything too heavy in these gift bags but they're perfect for giving cards or cookies or other little gifts!

stamps: Beautiful Season, Music notes wheel
ink: Real Red, old Olive, Soft Suede, early espresso
paper:  Real Red, old Olive, Soft Suede, very Vanilla
Big Shot: Fancy Fan embossing folder, Framelits Labels collection
other: Lunch sack, Bakers Twine, Blender pens


Click here to order Stampin' Up Products Online from me!

Saturday, November 17, 2012

Forest of Trees!


I'm not sure if I like this card or not… what do you think? I was trying the create a forest of trees with the Tree stamp from the Scentsational Season set and the coordinating framelit die. I first stamped the trees and then embossed it with the perfect polka dots embossing folder. Then I cut out a tree with the Framelit die and put green card stock behind it all. I added some red ribbon to make it more holiday. I finished the card off with the Merry Christmas sentiment from the Teeny Tiny wishes set. 


stamps: Scentsational Season, Teeny Tiny Wishes
ink: Garden Green, real red
paper:  Whisper White, Soft Suede, Garden Green, Real red, crumb cake
Big Shot: Holiday Collection Framelits,Perfect Polka Dots Embossing folder
other: Oval and Scalloped Oval punches


Click here to order Stampin' Up Products Online from me!

Thursday, November 15, 2012

Holiday Lodge Oval Card


Do you like this card with the oval middle? There's a trick to making this card where you create a "plate" with a piece of cardboard with the oval cut out of the middle and use that instead of one of the plastic plates when you emboss with the big shot. Isn't it cool? I love this idea-- it makes a perfect place to stamp an image.  For this card I used the house image from the Christmas Lodge stamp set with crumb cake ink and then stamped the sentiment over it with Cherry cobbler ink. I love this combo. What an easy and beautiful Holiday card!

stamps: Christmas Lodge, Holiday Greetings
ink: Soft suede, Cherry Cobbler
paper:  Whisper White, Soft Suede, Cherry Cobbler
Big Shot: petals a plenty Embossing folder, 
other: Crumb Cake Seam binding ribbon, chipboard with oval cut out


Click here to order Stampin' Up Products Online from me!

Wednesday, November 14, 2012

Easy Framelit Tree Card


I don't think I've shown you a card using the tree from the Holiday Framelits collection yet so I thought I'd try to make one. This tree shape is super cute. I love the little polka dotted tree stamp too from the Scentsational Season set. I stamped the tree on the circle and then cut one out using the framelit. They make a cute little tree duo! I'm on a roll with Simple Holiday cards this year. I love how easy  it is to make cute and simple cards using these framelits!


stamps: Scentsational Season, Teeny Tiny Wishes
ink: Gumball Green, Early Espresso
paper:  Whisper White, Soft Suede, Gumball Green, Baja Breeze
Big Shot: Holiday Collection Framelits, Lacy Brocade Embossing folder
other: Circle punch, Gumball Green Stitched Satin Ribbon


Click here to order Stampin' Up Products Online from me!

Tuesday, November 13, 2012

Hot Chocolate Mug!


I love the cute little mug in the Scentsational Season stamp set. I imagine it filled with Hot Chocolate, of course! For this simple card I used the Big shot to cut out the mug with the coordinating Holiday Collection Framelits die. Then I added on a little bling in the center with an adhesive rhinestone. The rest of the card is super simple. I punched a large circle and added the steam from the mug above it. The striped paper is from the Be of Good Cheer paper pack. It always amazes me how little patterned paper you need to use to really add a lot of color and fun to a card… I really only used a very small strip but it adds so much! Then I stamped the Merry christmas and added that on as a flag too.  This card is super simple and would make a great holiday card!


stamps: Scentsational Season, 
ink: Early Espresso, Cherry Cobbler
paper:  Very Vanilla, Crumb Cake, Gumball Green, Early Espresso, Be of Good Cheer Designer paper pack
Big Shot: Holiday Collection Framelits, Perfect Polka Dots Embossing folder
other: Circle punch, Rhinestone


Click here to order Stampin' Up Products Online from me!

Monday, November 12, 2012

Shaker Ornament Card


Here's another shaker card made with the shaker frames - I love these, they make shaker cards so easy! For this Card I used the ornament from the Chock Full of Cheer Set as the background image of my shaker. then I stamped the ornament top on the top layer and filled it with Chunky glass glitter. I added some bakers twine to the top to give it the illusion of hanging. Shaker cards are so much fun and perfect for holidays! Like this shaker card? Check another shaker card I posted using the Happy Hour set here.


stamps: Chock full of Cheer
ink: Gumball Green, Cherry Cobbler, Whisper White
paper:  Whisper White,  Cherry Cobbler, Be of Good Cheer Designer paper pack
other: Circle punch, Glass Glitter, Window Sheet, Shaker Frame, Bakers Twine


Click here to order Stampin' Up Products Online from me!

Tuesday, November 6, 2012

Sweet Candy Cane Card


Happy November! I'm a little behind on blogging since I've been spending lots of time getting stuff together for my Holiday craft fair this weekend-- but I've finally had a minute to take some photos so here's what I've been up to!

This candy Cane card is one that we made at my stamp-a-stack last week. The theme for this class was super simple cards- ones that could be quickly made and would be perfect to copy if you need to make a whole stack of them for holiday cards. The first one was this pretty little candy cane card. You simply cut out the candy cane from the Holiday Collection framelits set  with the Big Shotand then put some ribbon on white card stock behind it! Then I added the sentiment and some bakers twine to the bottom and a little pop of green with the stitched satin ribbon. Easy and so cute!


stamps: Greetings of the season, 
ink: Early Espresso
paper:  White, Real red, Crumb Cake
Big Shot: Holiday Collection Framelits
other: stitched grosgrain ribbon in real red, Stitched Satin ribbon in Gumball green


Click here to order Stampin' Up Products Online from me!

LinkWithin

Related Posts with Thumbnails