
From now until Tuesday, there are some great deals available only on the website! Plus, Free Shipping with a $150 order! Click the image above to check it out!

 I can't get enough of this owl punch-- I used it to make this penguin! Isn't he cute? You simply cut off the owls ears to make it look like this. I used the little heart piece to make his beak! So much fun! The card is really simple too. I stamped some snowflakes on Marina Mist Card stock using the Serene Snowflakes set and then tore it before adhering it to the white card to make it look like a hill of snow! then a Simple Merry Christmas on the bottom and some red satin ribbon to make it look pretty.
 Sorry! I've been super bad about keeping up with my blog right now. I've been so busy working on holiday projects and doing workshops that I haven't had much free time. Good news is, I have a ton of projects to share... now I just need to find some time to share them!
 Check out this cute pumpkin! He's so easy to make if you have a big shot. I just cut out six ovals from pumpkin pie card stock using the Scallop Oval big shot die (now I have to figure out what to do with all my extra scallops since I didn't need them for this guy). Once you have enough ovals you just need to sponge the edges with pumpkin pie ink to make them look aged. Then glue 3 together to make your front and 3 for the back. I made a face by punching out a square and cutting it up into triangles. And the mouth is just the oval punched out twice to make a smile. For the stem I used the designer label punch and for the leaves I used two petals from the 5-petal flower punch!
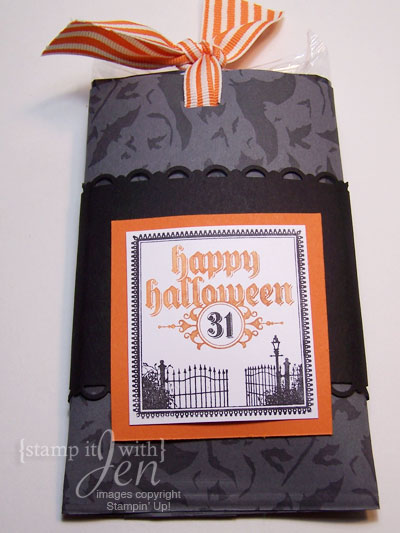 Another Halloween treat to share today. This one is a Popcorn slider. These are really easy to make. You just decorate a piece of card stock big enough to fit around your popcorn. I used the Bring on the Bats roller to stamp mine. Then you adhere the cardstock around the popcorn (but don't glue it TO the popcorn). You also need to adhere the bottom shut. I used some adhesive and then to make it look cute, ran it through the paper crimper just a bit (like 1/2" up) to make the edge look crimped. Then you can decorate the pocket anyway you like. I used the cool Happy Halloween stamp from the set Dark and Dreary.
 Super cool, right?
 I just love silly Halloween treats! I made some coffins last year and I couldn't resist re-visiting the idea this year. I wanted to make it different so I used the spider web embossing folder to create the background image. Then I sponged a little bit of frost white shimmer paint over the embossed parts to make the web look really cool. I wanted to make it look spookier so I stamped the fright night stamp onto vellum paper with versamark ink and embossed him with white embossing powder! Doesn't he look creepy? Then I attached him onto the coffin with brads.
 Isn't he cool. I found these yummy gummys dudes and thought they were perfect!
 I love these sweet treat cups! They make cards and treats so much fun! Last year I did a whole class with the Sweet Centers set and this year I had to pull it out again for Halloween! This is a little 3"x 3" Shaker... but the cool thing about it is that you can get the candy out without wrecking it. I made a slider on the back side... You pull on the ribbon tab and the candy comes out:


