Today is the last day for the Sale-a-bration! This card uses one of the sets you can get for free with a $50 order. This is my favorite set in the Sale-a-bration mini - I love how easy it is to make pretty cards with it. If you want to get this set for free, contact me today or check out my website for details!
For this card I used the Baby Wipe technique to get the cool multi-colored image! Then I simply added a butterfly with a dimensional and the sentiment "a note of thanks" to finish off the main image. Then add some ribbon and an embossed background using the Vintage Wallpaper embossing folder in the big shot!
stamps: Thank you kindly, Bliss
paper: whisper white, old olive, marina mist, pacific point
ink: old olive, marina mist, pacific point, early espresso
other: marina mist taffeta ribbon, vintage wallpaper embossing folder, baby wipes, re-inkers
Thursday, March 31, 2011
Wednesday, March 30, 2011
One more dryer sheet card
One last dryer sheet card to share. This time I didn't add glitter.. the glitter is optional and I wanted to make this one a little more gender neutral. I used the stamp set Nature Walk and stamped the floral image and the bees. Then I used the Woodgrain background stamp to give it more of a natural look! I love how this turned out!
stamps: Nature Walk, Woodgrain Background Stamp, sincere salutations
ink: pear pizazz, Poppy parade, early espresso, daffodil delight
paper: whisper white, poppy parade, early espresso, pear pizazz
other: pear pizazz stitched poly ribbon, dryer sheet, glue stick, oval punch, dimensionals
stamps: Nature Walk, Woodgrain Background Stamp, sincere salutations
ink: pear pizazz, Poppy parade, early espresso, daffodil delight
paper: whisper white, poppy parade, early espresso, pear pizazz
other: pear pizazz stitched poly ribbon, dryer sheet, glue stick, oval punch, dimensionals
Tuesday, March 29, 2011
Dryer sheet hello
Here's another card similar to the one we made in my class. I think this shows how you can easily adapt a technique and make a similar card using a different stamp set! For this card I used the set Awash with Flowers but used the same technique and color palette as the previous post. I also used my new jewelry tag punch to add a cute little "hello" stamped from the set Tiny Tags. I attached the tag with a piece of crochet thread.
Here's a close up:
stamps:Awash with Flowers, Tiny Tags
ink: regal rose, so saffron, pear pizzaz
paper:regal rose, so saffron, pear pizzaz, whisper white
other:dryer sheet, glitter, glue stick, jewelry tag punch, pretty in pink grosgrain ribbon, square lattice embossing folder, big shot
Here's a close up:
stamps:Awash with Flowers, Tiny Tags
ink: regal rose, so saffron, pear pizzaz
paper:regal rose, so saffron, pear pizzaz, whisper white
other:dryer sheet, glitter, glue stick, jewelry tag punch, pretty in pink grosgrain ribbon, square lattice embossing folder, big shot
Monday, March 28, 2011
Sparkly Dryer Sheet!
Here is a card that we made at my technique class last week! It's a technique using a dryer sheet... It's amazing how something so simple and unexpected can look so pretty! Here's a close-up:
You can see a little better in the close-up how sparkly it is! Everyone in the class got glitter all over them... but the cards are so pretty I hope they didn't mind. I'm having a ton of fun with the technique class finding fun techniques to share!
stamps: Great Friend, sincere salutations
ink: regal rose, so saffron, pear pizzaz
paper: regal rose, so saffron, pear pizzaz, whisper white
other: dryer sheet, glitter, glue stick, scallop oval punch, oval punch, dimensionals, daffodil delight taffeta ribbon, scallop trim border punch, perfect polka dots embossing folder, big shot
Thursday, March 17, 2011
Happy St. Patricks Day!
Happy St. Patrick's Day! I made this cute little gift for some Irish friends of mine! I took an empty produce container (I think it was from blueberries) and filled it with green and silver hershey kisses. Then I created a pretty little wrap to go around it. I took a piece of wild wasabi card stock and crimped it before attaching it around the item. Then I used and scallop oval die with my big shot to make the brown oval and cream colored scallop border. The 4 leaf clover is a flower from the fun flowers big shot die with one petal cut off! I used oval punches to make the stem. The sentiment "lucky you" is from the level one hostess set Afterthoughts. Then I used some buttons I had lying around to dress it up a bit. Sweet and simple!
Monday, March 14, 2011
Mushroom Birthday!
I just got the funky four stamp set this month. I've always liked this set and was excited to see it on the list of stamps you can get for free by spending $50... so I got to check it off my wish list for free! How cool is that? If you are interested in getting a free set, contact me for more info...
To make this card a choose a sort of retro color theme of pumpkin pie, wild wasabi, and tempting turquoise, very vanilla and early espresso. I added polka dots using the perfect polka dots embossing folder in the big shot.
The great thing about this card is you could give it to a girl or a guy!
stamps: Funky Four
ink: chocolate chip, pumpkin pie, tempting turquoise, wild wasabi
paper: very vanilla, chocolate chip, pumpkin pie, tempting turquoise, wild wasabi
other: dimensional dots, striped ribbon, perfect polka dots embossing folder
Saturday, March 12, 2011
Not just Valentines!
The Valentine Defined set is definitely a useful set... and not just for Valentines -I used it here as a thank you card! I colored all the hearts different colors with markers and stamped the tree on white cardstock. I added on a button and framed it with some pumpkin pie cardstock. The sentiment "a note of thanks" is from the thank you kindly stamp set. I also stamped some of the heart thought bubbles on a piece of regal rose to use as a background image.
stamps: Thank You Kindly, Valentine Defined
ink: markers - regal rose, pumpkin pie, wild wasabi, rich razzleberry, early espresso
paper: regal rose, pumpkin pie, wild wasabi, whisper white
other: crumb cake, border punch, seam binding ribbon, button
stamps: Thank You Kindly, Valentine Defined
ink: markers - regal rose, pumpkin pie, wild wasabi, rich razzleberry, early espresso
paper: regal rose, pumpkin pie, wild wasabi, whisper white
other: crumb cake, border punch, seam binding ribbon, button
Friday, March 11, 2011
Nature Walk Thank you
I just can't get enough of this Nature Walk Stamp set-- it's so easy to work with and makes beautiful cards quite easily. I love overlapping the images in this set. I stamped the floral image first and then stamped the bird over the top. The clear blocks make it easy to see where you are stamping. Then I stamped the "thanks" from the set Thank You Kindly in baja breeze over the top. To make the ruffly looking ribbon I frayed the edge a bit and then pulled a strand from the ribbon center... the ribbon will sort of ruffle up. Then I glued it down to the card. I felt like the card needed some more embellishment so I punched out a circle and stamped a bee on it and added a button for some extra dimension. I love how this turned out!
stamps: Nature Walk, Thank You Kindly
ink: wild wasabi, baja breeze, soft suede
paper: wild wasabi, baja breeze, very vanilla, soft suede, crumb cake
other: button, circle punch, dimensional, seam binding ribbon
stamps: Nature Walk, Thank You Kindly
ink: wild wasabi, baja breeze, soft suede
paper: wild wasabi, baja breeze, very vanilla, soft suede, crumb cake
other: button, circle punch, dimensional, seam binding ribbon
Wednesday, March 9, 2011
Daisy Card
Can you tell I've got spring fever? Here is another springy card. I had cut out some daisies using the Big Shot Daisies #2 die and decided it was time to use them on a card. There are 3 sizes of daisies on this die, I have two cut out from white cardstock and the 3rd one I actually cut out from a sheet of thin plastic. Here's a close-up so you can see...
The cool thing about the Bigz dies for the big shot is that they cut through all kinds of things, paper, chipboard, plastic... I try to save plastic from packaging that I get - it makes a fun accent!
I attached the daisy layers together with some glue dots and added a button in the center. Then I attached it to a piece of crumb cake card stock. I stamped the sentiment "thanks" from the Thank you Kindly Stamp set.
stamps: Thank You Kindly
ink: Early espresso
paper: Springtime Vintage, Baja Breeze, crumb cake, not quite navy, early espresso
other: scallop trim border punch, Daisy big shot die, seam binding ribbon, plastic, button
Monday, March 7, 2011
Blissful Spring
It gets so dreary this time of year I thought I'd try to add some sunshine with some bright colors! For this card I used Daffodil delight, tempting turquoise, and old olive for a bright fun color palette. The stamp set I used is called Bliss -- It's one of the sets you can get for free with a $50 purchase this month. I stamped the flourish and butterflies and flowers in a random pattern and then framed them with the turquoise. I added some of the pretty satin ribbon around the middle and stamped the sentiment best wishes from the sincere salutations set and punched it out with the Large Oval punch. The background embossing was created with the Vintage Wallpaper Embossing folder in the big shot!
Hope you have some sunshine today!
stamps:Bliss, Sincere Salutations
ink:tempting turquoise, old olive, daffodil delight
paper: whisper white, tempting turquoise, old olive, daffodil delight
other: Satin ribbon, dimensional dots, large oval punch, scallop oval punch, vintage wallpaper embossing folder
Saturday, March 5, 2011
One-Sheet Wonder Tote and cards
Here is an image of what you will be making if you signed up for my one-sheet-wonder class! All of the stamped images on these cards are made from one sheet of paper, cut into pieces so not only do they all coordinate perfectly, but you also save on supplies! Plus, it's super quick to make! Simply change the stamp set and color palette for a whole new look!
There's still time to RSVP if you haven't yet.. just let me know by the end of the day on Monday if you plan on attending! Hope to see you there!
Friday, March 4, 2011
Butterfly Bliss
This card I forgot to post earlier... it was a card that we made at my stamp-a-stack last month. It uses the stamp set Bliss, which is one of the sets you can get until the end of march for free with a $50 purchase! Contact me if you are interested. This is a really beautiful set! For this card I stamped the flourish with pear pizazz ink and then the butterfly with concord crush. I cut out the butterfly and added it on with a dimensional. For the background I used the Vintage Wallpaper embossing folder in the big shot on some pear pizazz paper. I stamped the word Bliss in two colors by coloring it with the brush side of the markers and then punched it out with the XL oval punch. I tried some of the chunky glass glitter around the edge. This glitter is unusal and really pretty! It has big shiny pieces! Here's a close-up:
stamp:Bliss
ink:concord crush, pear pizazz
paper:concord crush, river rock, pear pizazz, whisper white
other: Chunky glitter, vintage wallpaper embossing folder, XL oval punch, dimensional
stamp:Bliss
ink:concord crush, pear pizazz
paper:concord crush, river rock, pear pizazz, whisper white
other: Chunky glitter, vintage wallpaper embossing folder, XL oval punch, dimensional
Thursday, March 3, 2011
Faux Silk Technique
Here is the other Technique we did at my February Technique Class. This one is called Faux Silk. It's sort of hard to see the technique in the photos but it has a cool sort of wrinkled silk appearance in person. To make the card I used the stamp set Vintage Vogue and the color combo of Rich Razzleberry, regal rose and old olive. I also added on a bitty button to make the center of one of the flowers!
If you couldn't make it this technique class I will be doing another one next month. Next time I'm going to show you how to do sparkly dryer sheet and baby wipe techniques! Contact me for more info!
stamps: Vintage Vogue
ink: Rich Razzleberry, Regal rose, old olive
paper: Rich Razzleberry, Regal rose, old olive, whisper white
other: Satin ribbon in old olive, Eyelet border punch, bitty button, linen thread
Wednesday, March 2, 2011
Cracked Flamingos
Here is another card I made with the cracked glass technique. This time I stamped the flamingos from the Valentine Defined stamp set and punched them out with the heart punch! Then I created the cracked glass technique on the heart! I love how pretty this turned out. Then I stamped some hearts on lines behind it from the same set. I think this would make a pretty valentine or wedding card!
stamps:Valentine Defined
ink: Regal rose, early espresso
paper:crumb cake, very vanilla, regal rose
other: taffeta ribbon, scallop trim border punch
stamps:Valentine Defined
ink: Regal rose, early espresso
paper:crumb cake, very vanilla, regal rose
other: taffeta ribbon, scallop trim border punch
Tuesday, March 1, 2011
More Cracked Glass
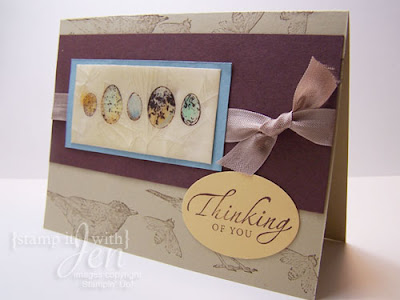
I was having so much fun with the cracked glass technique here are a few more cards I made using the Nature Walk Stamp set. On these cards I colored the image before I did the technique. This takes a little longer but it turns out so pretty with this set. I used watercolor pencils to color them. The first one I used the egg image as the main focus and stamped some of the other images with chocolate chip onto the crumb cake cardstock base.
For the second card below I used the Vintage Wallpaper Embossing folder to add some texture to the card along with the Cracked glass technique.
This last one I used two butterflies punched from the Botanical Gazette paper and one that I stamped and colored the third one. Then I framed them all with scallop circle punches.
Hope you enjoyed these cards. Contact me if you have any questions!
Subscribe to:
Posts (Atom)