Saturday, December 25, 2010

Merry Christmas!...and some candle boxes

MERRY CHRISTMAS EVERYONE!!
I hope everyone is having a safe and happy holiday and
spending some quality relaxing time with their families..


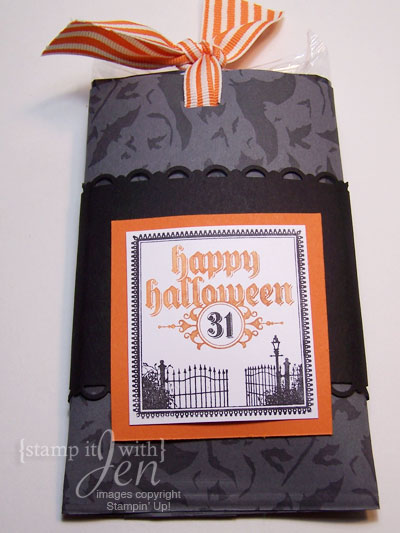
Here are some candle boxes I made...some for the holiday craft fair and some for gifts. These are really fun to make... I made up all the boxes first and then stamped the candles. The hardest part was finding votive candles the right size to fit in the boxes. I had a bunch of boxes made and then I couldn't find more candles the right size....eventually found some but who knew that votives came in all different heights? I guess that's a lesson learned... make sure you have all the supplies you need for your project before making a bunch more!!

I made these in a bunch of different colors and stamp sets.


Friday, December 24, 2010

Christmas Fudge

Here's a cute way to make some quick gifts and use up some designer paper! I just wrapped Hershey Bars with some leftover designer series paper (adhered with Sticky strip so it stays on) and then printed out this cute poem to put on the front! Perfect for last-minute gifts! Add some ribbon to make it even cuter!

Here's a close-up so you can read the poem:


Thursday, December 23, 2010

M & M sticks!

This is one of the items I made for my craft fair a few weeks ago. Aren't they cute? You can buy cello bags in all kinds of sizes if you search around online. These are 1" x 8" and are the perfect size for filling with M&Ms! Filling them was a bit tricky, I had to fashion a funnel out of paper... but they turned out super cute! I then finished them off with an image punched out of a circle and two scallop punches. I used the Season of Joy stamp set.

Here's another view of the whole stick:


Wednesday, December 22, 2010

Filled with Love Promotion


December 17–January 24
Get a FREE package of Bitty Buttons when you purchase a Filled with Love Bundle, including the Filled with Love Stamp Set and exclusive Love Patterns Designer Series Paper Pack—only available through this special promotion!

Description

Wood-Mount Item Wood-Mount Price Clear-Mount Item Clear-Mount Price

Filled with Love Bundle
Contains the Filled with Love Set* and Love Patterns Designer Series Paper Pack

124380 $32.90 124381 $26.90

Lleno de Amor Bundle
Contains the Lleno de Amor Set* and Love Patterns Designer Series Paper Pack

124382 $32.90 124383 $26.90

Plein d'amour Bundle
Contains the Plein d'amour Set* and Love Patterns Designer Series Paper Pack

124384 $32.90 124385 $26.90

Love Patterns Designer Series Paper Pack (non-bundled)
12 sheets total: three 12" x 12" sheets of two double-sided designs in Real Red and Pretty in Pink

124156 $9.95 --- ---

Here's an image of the stamp set:


And the free buttons:


Contact me to order or order from my website below.

Snowflake Magnets!


Need a quick, last-minute gift? These are super easy to make! you start with large pebbles from the floral section of any craft store. Pick out the ones that have the least flaws/cracks. Then stamp an image on white card stock that will fit under the pebble. I used the Northern Hearts hostess stamp set with some Pacific Point ink. Give your image a bit to dry. Then put a dab of crystal effects on top of your image (you don't need much, just a dime size drop or less) Then put the pebble over the crystal effects and smoosh it down. Let it dry a few hours, then cut off the excess paper and glue a magnet onto the back. These are heavy so make sure you buy strong magnets! That's it. I made mine cute by placing them in a cello bag and adding a coordinating header.

Tuesday, December 21, 2010

...Countdown to Christmas!


Sorry I haven't posted lately... I've been SO crazy getting Christmas stuff done... crafting, shopping, baking... you know how it goes, right! It will be a miracle if it all gets done in time! I do have lots of cute little holiday gifts to share with you. Here's the first...

Here's a cute little fast holiday treat! I used the Candy Wrapper die with Real red and old olive cardstock to make these cute little guys.Then You simply fill them with some candy, chocoloate of course, and add a little piece of designer paper to wrap them cute. Then I stamped the sentiment "Happy Holidays" from the sincere salutations stamp set and punched it out with the Large oval punch. Aren't they adorable? I think I'm going to bring these to christmas eve to set on everyone's plates!!

stamps:Sincere Salutations
ink:Real red, Old Olive,
paper:Real red, Old Olive, Whisper White, Designer paper
other:Candy Wrapper Die, Big Shot


Saturday, December 11, 2010

Holiday Class today!

Today is my holiday gift class! This is a favorite class of some of my customers because it helps them create some great little gifts for their friends and family. This calendar is one of the projects that they can make today. It's super cute and simple since it fits into a cd case to sit on your desk! The hardest part is deciding which images to stamp on each page!

Here are the other things we are making today:

Stamped Candle in cello bag using the Day of Gratitude stamp set!:


Flower using the XL Big shot die and Deck the Halls fabric from the holiday mini:


Stamped ornament:
using the Merry Crittermas stamp set, stamped with Staz-on ink on window sheet and rolled to fit inside the bulb!


Snowman Soup:
Decorated the mug by cutting vinyl snowflakes out with the big shot and the Northern flurries die! then added some hot chocolate, a candy cane, hershey kisses and marshmallows inside a cello bag. Add a cute tag with a punch snowman and poem.


Friday, December 10, 2010

Another Critter card

I just love these cute critters in the Merry Crittermas stamp set. For this card I used the raccoons. I stamped them with black on white and colored them using markers. Then I framed them with some chocolate chip card stock and layered them on top of a piece of red cardstock embossed using the Petals-a-plenty embossing folder in my big shot. This card was very simple to make... the hardest part was coloring the little critters!

stamps:Merry crittermas
ink:black, markers
paper:wild wasabi, real red, whisper white, chocolate chip
other: Scallop trim border punch, Petals-a-plenty embossing folder


Thursday, December 9, 2010

Window holiday card!

If you haven't tried the Movers & Shapers Big shot die, you should definitely check it out!. This set of dies let's you create a window anywhere in the front of your card. For this card I made the window in the lower left corner and stamped the squirrel from the Merry Crittermas stamp set to peek through it! Isn't he cute? I also used a piece of paper from the Candy Cane Christmas paper pack. Can you tell it has glitter on the stripes? It's really sparkly!

stamps: Heard from the Heart, Merry Crittermas
ink: real red
paper: Candy Cane Christmas Designer paper, real red, whisper white
other: Movers & Shapers Big shot die, 5/8" satin ribbon(red), curly label punch

Wednesday, December 8, 2010

Simple Snowflake Christmas

Haven't started your holiday cards yet? Here is a super quick and easy one! I created the snowflakes using the Northern Flurry embossing folder in my big Shot. Then I spritzed the paper with a mix of champagne shimmer paint and alcohol (it's hard to see in the photo but its just a little subtle sparkle and its super pretty!). I stamped the sentiment "season's greetings" in cherry cobbler ink and added a green taffeta ribbon. Then attach the whole thing to a piece of cherry cobbler card stock! That's it! Super quick and easy... it's not too late to make your cards too!

stamps:Many Merry Messages
ink:cherry cobbler
paper: white, cherry cobbler
other: northern flurry embossing folder, old olive taffeta ribbon, shimmer paint


Tuesday, December 7, 2010

2 ways to use shimmer paint!


I really LOVE shimmer paint! For this card, I used shimmer paint in two different ways. I started with an embossed piece of white card stock (I used the Northern Flurry embossing folder to emboss the snowflakes). The first way was to use champagne shimmer paint on a sponge and apply it right to the snowflakes--since they're embossed, it's easy to apply just to the raised portion and not the whole card. Then I applied the silver shimmer paint directly to the snowflake stamp with a sponge and used it to stamp onto the not quite navy card stock, just like you would with an inked stamp. It looks so pretty! Then I punched out the snowflake with the ornament punch and added it to the card with a dimensional. I added some ribbon tied right above it so it appears as if it's hanging on the ribbon!

stamps: serene snowflakes, Christmas greetings
ink:marina mist
paper:whisper white, not quite navy
other:shimmer paint in champagne and silver, ornament punch, norther flurry embossing folder, 1/8" taffeta ribbon


Monday, December 6, 2010

Sweet Bunny Card!


One of my favorite sets in the holiday mini catalog is Merry Crittermas. It has such cute little critters to color! For this card I used the bunny and the sentiment " wishing you a season of sweetness". This is a really simple card. I just stamped the bunny onto white cardstock and colored him using makers. Then for the card base, I used the Northern Flurry embossing folder to create the pretty snowflake background. I really love this folder, It's so pretty! Then I used some taffeta ribbon and a "fork bow" to finish it off! Hope you like him!

stamps: merry crittermas
ink: black
paper:marina mist, whisper white, rose red
other: taffeta ribbon, northern flurry embossing folder


Sunday, December 5, 2010

Holiday Greetings!


Hello again! I'm finally able to find a few minutes to update my blog. I spent the past two days at the Stoughton Victorian Holiday fair and the past few weeks getting ready for it. I will show you photos of what I made soon (haven't downloaded them yet). The fair was a lot of fun but was taking up all of my time... so hopefully now things won't be so crazy - although with Christmas only a few weeks away, they probably will be!

Here's a card I made using the Serene snowflakes stamp set. I stamped it onto crumb cake card stock using whisper white, cherry cobbler and early espresso inks. The cool snowflakes are punched out using the Northern Frost decorative strip die for the big shot. Then I put a red glimmer brad in the center of one for some added sparkle! The "holiday greetings" sentiment is from the set Sincere Salutations.

stamps: sincere salutations, serene snowflakes
ink: whisper white, cherry cobbler, early espresso
paper: crumb cake, cherry cobbler, early espresso, whisper white
other: glimmer brad, Northern Frost Die, dimensional, border punch


Sunday, November 28, 2010

Online Sale Going on until Tuesday!


From now until Tuesday, there are some great deals available only on the website! Plus, Free Shipping with a $150 order! Click the image above to check it out!

Tuesday, November 16, 2010

Penguin from Owl Punch

I can't get enough of this owl punch-- I used it to make this penguin! Isn't he cute? You simply cut off the owls ears to make it look like this. I used the little heart piece to make his beak! So much fun! The card is really simple too. I stamped some snowflakes on Marina Mist Card stock using the Serene Snowflakes set and then tore it before adhering it to the white card to make it look like a hill of snow! then a Simple Merry Christmas on the bottom and some red satin ribbon to make it look pretty.

stamps: Serene Snowflakes, Christmas Greetings
ink:Marina Mist
paper:Marina Mist, Whisper White, black, Pumpkin Pie
other: Owl Punch, real red satin ribbon, dimensional


Sunday, November 14, 2010

Christmas Card Time!

Sorry! I've been super bad about keeping up with my blog right now. I've been so busy working on holiday projects and doing workshops that I haven't had much free time. Good news is, I have a ton of projects to share... now I just need to find some time to share them!

Here's a card that we did at my recent Christmas card stamp-a-stack. Didn't it turn out cool? You can't really tell in the photo but the white piece in the center is spritzed with some a mix of shimmer paint and alcohol that I put in a little spray bottle. It makes a great shimmery mist that adds just a little sparkle! I think this one was the champagne color. Then I stamped the wreath from the hostess set Northern Hearts. The bird is punched out using real red card stock and the XL bird punch. Then it's framed with some chocolate chip card stock. The card base is Crumb Cake with snowflakes stamped on it from the same Northern Hearts set with Versamark ink. The sentiment is from the stamp set Heard from the Heart.

Hope you enjoy this card. I will try to find time this week to post some more!

stamps:Northern Hearts, Heard from the Heart
ink:real red, wild wasabi, versamark
paper:Crumb Cake, chocolate chip, whisper white, real red
other: XL bird punch, champagne shimmer paint


Saturday, October 16, 2010

Pumpkin Treat holder

Check out this cute pumpkin! He's so easy to make if you have a big shot. I just cut out six ovals from pumpkin pie card stock using the Scallop Oval big shot die (now I have to figure out what to do with all my extra scallops since I didn't need them for this guy). Once you have enough ovals you just need to sponge the edges with pumpkin pie ink to make them look aged. Then glue 3 together to make your front and 3 for the back. I made a face by punching out a square and cutting it up into triangles. And the mouth is just the oval punched out twice to make a smile. For the stem I used the designer label punch and for the leaves I used two petals from the 5-petal flower punch!

Then I just made a little box from pumpkin pie cardstock to go between the two layers. I think It's about 3 inches high by one inch wide. You can make yours any size you'd like but mine fits two fun size m&m packages.

Last, I made the handle by punching out a long strip of old olive cardstock with the scallop ribbon border punch!

I just love how cute he turned out!

Friday, October 15, 2010

Halloween popcorn slider

Another Halloween treat to share today. This one is a Popcorn slider. These are really easy to make. You just decorate a piece of card stock big enough to fit around your popcorn. I used the Bring on the Bats roller to stamp mine. Then you adhere the cardstock around the popcorn (but don't glue it TO the popcorn). You also need to adhere the bottom shut. I used some adhesive and then to make it look cute, ran it through the paper crimper just a bit (like 1/2" up) to make the edge look crimped. Then you can decorate the pocket anyway you like. I used the cool Happy Halloween stamp from the set Dark and Dreary.

Then you need to make two slits or holes towards the top of the open pocket for the ribbon to go through. You need a really long piece of ribbon, put it all the way around the popcorn the long way, place the popcorn with the ribbon wrapped around it into the pocket and then put the ribbon through the holes you made, from the inside of the pocket to the outside. then tie a knot in the ribbon. Now you should be able to pull on the knot and have the whole popcorn slide in and out of the pocket. Here's how mine looked:

Super cool, right?
Hope you have fun if you try to make these!

stamps: dark and dreary, bring on the bats roller
ink: pumpkin pie, black
paper: gray, black, pumpkin pie, white
other: ribbon, punch, scallop trim border punch, crimper


Thursday, October 14, 2010

Fright Night Coffin!

I just love silly Halloween treats! I made some coffins last year and I couldn't resist re-visiting the idea this year. I wanted to make it different so I used the spider web embossing folder to create the background image. Then I sponged a little bit of frost white shimmer paint over the embossed parts to make the web look really cool. I wanted to make it look spookier so I stamped the fright night stamp onto vellum paper with versamark ink and embossed him with white embossing powder! Doesn't he look creepy? Then I attached him onto the coffin with brads.

tip: I like to try to attach vellum with brads whenever I can because if you attach it with adhesive you can usually see it through the vellum.

Then I tied it shut with some of the awesome 1 1/4" striped grograin.

Ooh... I almost forgot, here's whats inside:

Isn't he cool. I found these yummy gummys dudes and thought they were perfect!

stamps: fright night
ink:versamark
paper: black, gray, vellum
other: gummy guy, white embossing powder, brads, frost white shimmer paint


LinkWithin

Related Posts with Thumbnails