Showing posts with label Valentine. Show all posts

Monday, February 18, 2013

Birdie Valentine


One more valentine using the Sweet Heart set from Jane's Doodles. This time I used hearts to make "leaves" on the branch, which I think turned out really cute. I also like how this set has two birds that you can make facing each other - perfect for a valentine sentiment! 


stamps: Birds & Branch from Sweet Heart set (Jane's Doodles), Valentine Sentiment from Lots of Love set (avery elle)
ink: early espresso, crumb cake, cherry cobbler
paper: crumb cake, cherry cobbler, whisper white, early espresso
big shot: chevron embossing folder
other: bakers twine


Click here to order Stampin' Up Products Online from me!

Sunday, February 17, 2013

Caged Hearts


When I saw the cage and the hearts in the set from Janes Doodles I had the idea to combine them to make a cage bursting full of hearts for a valentine! I love how this turned out, I stamped the different heart images to appear as if they were filling the cage and overflowing. Then I added some bakers twine on the top of the cage so it would look like it's hanging from something. Isn't it cute?  Then I embossed a piece of pretty in pink card stock with the houndstooth embossing folder to match the houndstooth pattern in the heart! 


stamps: Seetheart set (Jane's Doodles), Sentiment Happy Valentines Day from Lots of Love set (Avery Elle), 
ink: early espresso, primrose petals, pretty in pink, whisper white
paper: primrose petals, pretty in pink, whisper white
big shot: Houndstooth embossing folder
other: twine, corner rounder


Click here to order Stampin' Up Products Online from me!

Saturday, February 16, 2013

Be Mine!


Another card using the Sweet Heart set from Jane's Doodles. I think the little owls are adorable - I love how you can give them different eyes! I made this card to send out as a valentine so I kept the color palette pinks and browns, with a pop of green on the leaves. to make the leaves, I used the wing from the Bird Builder punch from Stampin' Up!  I also used the chevron embossing folder to create a background since I thought it nicely mirrored the zig zag bellies on the birds!


stamps: owls from Sweet Heart set (Jane's Doodles), Be Mine from Lots of Love set (avery elle)
ink: early espresso, pretty in pink, crumb cake, primrose petals
paper: crumb cake, primrose petals, whisper white, patterned paper scrap (leaves)
big shot: chevron embossing folder
other: bird builder punch, bakers twine


Click here to order Stampin' Up Products Online from me!

Thursday, February 14, 2013

Happy Valentines Day!


Hope you are having a lovely valentines day and are able to have a sweet treat or spend it with someone you love! I had some fun this week making valentines so I will be sharing those with you! This one turned out to be one of my favorites! I love the look of the hearts on a clothesline or banner - and the cloud embossed background makes it extra sweet! 


 stamps: Lots of Love (Avery Elle)
ink: early espresso, crumb cake, primrose petals, pretty in pink
paper: very vanilla, core'dinations in primrose petals, crumb cake, early espresso
big shot: cloudy day embossing folder
other: brown/white bakers twine, sanding block, oval and scallop oval punches, dimensionals

Click here to order Stampin' Up Products Online from me!

Saturday, February 9, 2013

Faux Quilting Technique


This is the other technique for the Technique class this month - I don't know if you can tell very well in the photo but not only is the heart patchwork, it also has a quilted texture. This technique is easy to do with just some patterned papers and an embossing folder! 


stamps: Teeny Tiny Wishes
ink: early espresso
paper: Crumb Cake, primrose petals,  Print Poetry Designer Series paper stack
big shot: square lattice embossing folder, lacy brocade embossing folder
other: crumb cake seam binding ribbon, word window punch, dimensionals

Click here to order Stampin' Up Products Online from me!

Thursday, February 16, 2012

Love Card

Here is another card I made using the negative space the punch makes! I'm loving how fun these are! For this one I punched the heart out and used a white gel pen to make fake stitching marks around it. Then I put a white heart behind it that I stamped the word love on and added a button and two pearls to the heart. The embossed piece i found in my scrap drawer, rejected from an older project (gotta love that) but it was embossing using the vintage wallpaper embossing folder and sponged lightly with white ink. Then I added on a border punch (just a plain scallop) and some early espresso bakers twine!

I think this would make a great valentine but would also work for a wedding or anniversary card!

stamps: fabulous phrases
ink:pretty in pink, white
paper: crumb cake, whisper white, pretty in pink, rose red
other: large heart punch, adhesive pearls, white gel pen, vintage wallpaper embossing folder, scallop border punch, early espresso bakers twine

Monday, February 13, 2012

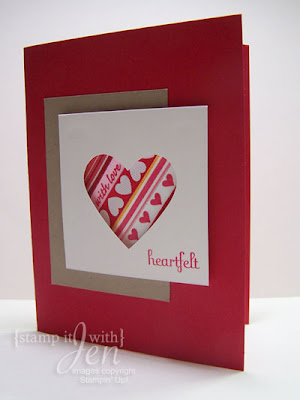
Heartfelt Valentine


Hello and Happy Valentine's Day! If you're wondering why I haven't posted in awhile here's the scoop - I've had some difficulties with my computer - hard drive crashed and we had to take it apart and put in a new one! Since I have an imac this was no easy feat! But thank goodness I had a back up drive so didn't loose much... just tons of time re-building and re-installing everything. Anyways, I'm getting back in the swing of things in time to share this valentine with you!

I have seen a couple cards like this online -- can't remember where but I loved the idea of using the negative shape the punch makes and filling to to make a pretty card! I used strips of ribbon out of my stash (wow.. have a ribbon story to share later this week), so it's not SU but you could do the same thing with SU ribbons too! I stamped the word "heartfelt" from the set fabulous phrases in the corner and added some dimensionals to make it pop off. This is a really simple card but I love how it looks! Sometimes I have to tell myself to keep it simple.

Close up:
hint: if you want to make sure your shape is centered on the cardstock square, just draw an x in the middle of your square before you punch it and then center the x in the the middle of the punch... tah dah!

stamps: fabulous phrases
ink: real red
paper:whisper white, crumb cake, real red
other: Ribbons (not SU), Large Heart Punch, dimensionals

Wednesday, February 1, 2012

Easy Valentine!

Here is a quick and easy valentine you can make for everyone! I love the color combo on this card-- Cherry Cobbler, Chocolate chip and pretty in pink! It's so simple to make- I just created the background texture using the houndstooth embossing folder on the chocolate chip cardstock, then I punched out 3 squares with the postage stamp punch. The hearts were cut out with the new fashionable hearts emboslits die. This little bitty die embosses AND cuts at the same time.. makes 5 different tiny hearts with each pass! I have a tip about these little dies... I keep all my extra hearts in a little container... sometimes you might just need one pink one like I used on this card but now I have 4 other pink ones ready the next time I need a heart!


I also used some cherry cobbler bakers twine and stamped the message Happy Valentines Day from the stamp set teeny tiny wishes and punched it out with the word window punch!

Tuesday, February 8, 2011

Valentine

Here is a quick Valentine from my Stamp-a-Stack. I started with a the top note shape, cut from whisper white using the big shot die. Then I stamped the tree -- I love the tree from this set-- by coloring it with markers. Then I stamped the Valentine definition below it. To add some dimension I punched out the heart and added it on with a dimensional. Finish it off with some pretty in pink grosgrain ribbon and that's it!

stamps: Valentine defined
ink: real red, regal rose, chocolate chip
paper: whisper white, real red, chocolate chip
other: pink grosgrain ribbon, dimensional, top note big shot die, small heart punch


Thursday, February 3, 2011

Citrusy Valentine...

WOW.. I FINALLY broke out of my crumb cake, rose and chocolate chip color palette for valentines! I used the Valentine Defined set again but I thought I'd try to do something more in the sweet citrus tones. The colors I used are pear pizazz, early espresso, pumpkin pie and regal rose. The colors in this card remind me of sherbet or those conversation hearts! I really love this valentine set and now that I've used it with some different colors I think it could be really versatile for making any sort of card.

The tree is really cool. I admit it did take me awhile to color in all those little hearts with the marker but the effect is so pretty I think it's worth the time. I added some early espresso cardstock that I embossed using the perfect polka dots embossing folder to match the tree trunk. Then when I went to add some ribbon I reached for the daffodil delight... I'm not sure why since I hadn't used any yellow on this card but I love how it added another citrus color to it! Then to add a little more interest at the end I added on a bitty heart button.

Here's a close-up so you can see how cute it is!


stamps:Valentine Defined
ink: pumpkin pie, regal rose, early espresso, pear pizazz
paper: whisper white, pumpkin pie, regal rose, early espresso, pear pizazz
other: perfect polka dots embossing folder, big shot, mini glue dot, bitty button, linen thread, large oval punch, scallop oval punch, dimensionals, 3/8" taffeta ribbon in daffodil delight


Sunday, January 30, 2011

Letterpress Valentines

I thought I'd give the Lots of Love letterpress a try - I've had this for awhile but haven't played with it much. It's similar to an embossing folder except that it just presses the paper from one side and you can also add ink to it! I used a chocolate chip craft Stampin' Spot to ink just the large word love. Then I put it through the Big Shot using some pink pirouette cardstock. I did this twice and made two cards with it.

Here is the other card:I made both card pretty simple since the letterpress is so pretty. I really like how elegant it looks. This would make a great wedding card too!

stamps: none!
ink: chocolate chip
paper:crumb cake, chocolate chip, pink pirouette
other: Lots of Love Letterpress plate, big shot, scallop trim border punch, eyelet border punch, rose red seam binding ribbon


Saturday, January 22, 2011

Simply Valentine

I was browsing through my stamp collection and found the set Simply Said, which I haven't used in quite a while so I thought I'd pull it out and make a valentine! I'm sorry if you're getting bored with the color scheme I'm using for most of my valentines but I really love how it looks together!

I stamped the hearts onto some scrap whisper white using crumb cake, pretty in pink and rose red inks. Then I punched them out with the square punch and framed them with scallop squares punched out of chocolate chip and rose red card stock. Then I sent a piece of pretty in pink card stock through the big shot with the perfect polka dots embossing folder. I added some rose red seam binding ribbon and finished it off with the "love you" from the Valentine Defined stamp set.

Are you inspired to make Valentines yet?

stamps: Simply Said, Valentine Defined
ink: Early Espresso, crumb cake, pretty in pink, rose red
paper: Whisper White, Crumb Cake, Early Espresso, Rose Red
other: rose red seam binding ribbon, perfect polka dots embossing folder

Wednesday, January 19, 2011

One more flamingo card...

Are you sick of those flamingos yet? I just love them!

Here's another card using the Valentine Defined Stamp set with those cute flamingos. I used the melon mambo cardstock on this one again, pairing it with early espresso this time. I stamped the early espresso card stock with the "love you" image with early espresso ink. Then I stamped the lines of hearts with melon mambo ink on pretty in pink cardstock. The flamingos are stamped with pretty in pink ink and melon mambo for the heart on whisper white and punched out with the large oval punch. I then added some ribbon and a scallop trim border. Then I realized I hadn't left much room for a sentiment on the bottom so I went searching through my stamps and found the sentiment that I used from the Always stamp set. It says "always on my mind- forever in my heart" -- perfect for a valentine!

stamps: Valentine defined, Always
ink: Early espresso, melon mambo, pretty in pink
paper: Early Espresso, melon mambo, pretty in pink, whisper white
other: pretty in pink grosgrain ribbon, Scallop Trim Border Punch
, dimensionals


Tuesday, January 18, 2011

Love those flamingos!


Another Valentine using the Valentine Defined Stamp set. This time the color palette I used is a little softer but still using the pink and brown tones like yesterdays card. I started this time with a crumb cake base and stamped some of the heart branches across the bottom with crumb cake ink. Then I stamped the little heart image (I think it looks like a clothesline) on a piece of pretty in pink card stock. The flamingos are again in melon mambo ink on whisper white. Again, I used some seam binding ribbon... I'm ADDICTED to this ribbon.... this time in crumb cake.

And, with my coordinating envelope:


stamps: Valentine Defined
ink: crumb cake, melon mambo, chocolate chip
paper:whisper white, pretty in pink, crumb cake
other: crumb cake seam binding ribbon

Monday, January 17, 2011

Valentine Defined

It's a snowy day here so I thought this card would bring a little color and brightness into your day! I just started playing with this set, Valentine Defined, from the Occasions Mini catalog and I'm having a lot of fun with it. It has a lot of versatile pieces that would make great valentines but also some other types of cards. These flamingos would make a great summer birthday card or anniversary card as well!

For this card I used an interesting color combo-- bright melon mambo and the subdued crumb cake with a bit of chocolate chip. I think the colors, although intense, compliment each other quite nicely.

I made cut the crumb cake cardstock using the top note die in my Big Shot. Then I stamped the heart branches using chocolate chip across the bottom and the "love you" from the same set using chocolate chip and melon mambo ink. I stamped the flamingos on a piece of scrap whisper white paper and punched them out with the 1 3/8" circle and framed them with the scallop circle punched out of chocolate chip. I used some of the Rose red seam binding ribbon across the whole thing and then attached the flamingos with a dimensional.

Here it is with the coordinating envelope:

stamps:Valentine Defined
ink: melon mambo, chocolate chip
paper: melon mambo, chocolate chip, whisper white, crumb cake
other: rose red seam binding ribbon, top note big shot die, scallop circle punch, 1 3/8 circle punch, dimensional dot


Thursday, January 13, 2011

Simple Chocolate Card

Here is a quick and easy card using the Eat Chocolate Stamp set. I started with Pretty in Pink and Chocolate chip... I just LOVE these colors together...especially for Valentines! I embossed the piece of Chocolate chip using the Vintage Wallpaper embossing folder in my Big Shot so give some fun texture to the simple card. Both of the sentiments I used are on the same stamp so I used markers to color it, first not coloring the "...I'm that friend" portion to stamp the top, then again, stamping just the "...I'm that friend" portion and punching it out with the word window punch. I thought it might look nice to separate them a little more than they are on the stamp.
I also used some crumb cake seam binding ribbon to attach the sentiment and add some sweetness to the card!

Have I inspired you to make Valentines yet? Sign up for my Spring Stamp-a-Stack... we will be using this set that night!

stamps:Eat Chocolate
ink: Chocolate Chip, Rose Red
paper: whisper white, pretty in pink, chocolate chip, crumb cake
other: Crumb Cake seam binding ribbon, Word Window Punch


Tuesday, January 11, 2011

Eat Chocolate


At long last I am sharing some new stuff with you! I meant to post these days ago but the time has gotten away from me this week! Here's a fun card I made using the new Eat Chocolate set from the 2011 Occasions Mini catalog. I made this cute background by stamping the "so much Chocolate, so little time" stamp randomly over a piece of Crumb Cake card stock using early espresso ink. The main image I stamped by carefully coloring it with the brush ends of the markers and stamping it onto whisper white cardstock. Then I used a glue pen and some glitter to make it sparkly. Here's a close up-- can you see the glitter? It's kind of hard to see in the photo but it's super cute in person.


I punched out the image using the Decorative Label punch (this is in the new mini again so if you didn't get a chance to order it from the holiday one, you still can!)

This card also uses some of the seam binding ribbon. I ordered a few colors of this and LOVED it so I decided to do a share of it. Let me know if you're interested in participating in the share. This ribbon is really thin and sheer... the images in the catalog don't do it justice at all.

Hope you enjoyed this card... I think it would make a great Valentine!

stamps:Eat Chocolate
ink: Early Espresso, Pretty in Pink, Rose Red
paper: whisper white, pretty in pink, rose red, chocolate chip, crumb cake
other: Rose Red seam binding ribbon, dimensionals, Decorative Label Punch


Sunday, February 14, 2010

Happy Valentines Day!


Hope you are having a great Valentines Day with your loved ones!

Here is one last valentine to share with you! This one was super simple to make. I used the jumbo roller I {love} Love from the Occasions mini and rolled it out with real red ink on very vanilla card stock. I tied some red satin ribbon around it and framed it with Chocolate Chip card stock that I used the scallop trim border punch on. Then added it to my real red card stock base and added the sentiment "with all my heart" from the With All my heart set.

A simple, sweet and easy Valentine!

stamps: I {Love} Love, With all my Heart
ink:real red, chocolate chip
paper:real red, very vanilla, chocolate chip
other: real red satin ribbon, scallop trim border punch

Saturday, February 13, 2010

Milk Carton Caddy

I made this for the hostess of my last workshop! I made the cartons using the new mini milk carton die for the big shot that is in the occasions mini. I love these cute little milk cartons and saw the tutorial showing how to make the little caddy for them on Kathleen's blog here and knew I had to try it. I love how easy this was to make and so cute. You could make it for any occasion by changing the colors and paper you use! For mine, I used chocolate chip and the Sending Love designer paper!

LinkWithin

Related Posts with Thumbnails