Showing posts with label 3D Items. Show all posts

Sunday, January 6, 2013

Yarn wreaths with Felt flowers


I'm almost done sharing holiday projects -- I had so much fun making these yarn/felt wreaths for craft fairs and christmas gifts. It was fun trying different color combos of yarn and felt. Wrapping the foam wreath with the yarn was very time consuming -- it took over an hour to do each one plus the time to make all the flowers but they turned out so pretty! All the felt flowers are made with different dies in the big shot and then either sewn or glued together! Hope you enjoy them!


Click here to order Stampin' Up Products Online from me!

Saturday, January 5, 2013

Quick and easy Gift Bags


Once the gifts were ready I needed some extra gift bags... Luckily I had in my stash some plain kraft and white gift bags just begging to be dressed up for the holidays! I simply added on a sheet of paper from the Festival of Prints designer paper pack. Then I added a snowflake cut out with the  big shot Snow Flurries die and an oval stamped with Peace on earth! These went together very quickly and are so pretty!


stamps: Greetings of the season
ink: cherry cobbler
paper: Festival of Prints designer paper stack, whisper white
big shot: Snow Flurries Bigz Die


Click here to order Stampin' Up Products Online from me!

Friday, January 4, 2013

Handmade Holiday Gifts


Now that the holidays are over and the gifts are unwrapped I can share a few of the ones I made this year. I found this idea on pinterest -- chalkboard mugs! Although it was a little harder than I thought it might be. I carefully used painters tape to tape off a section of the mug where I wanted the chalkboard area to be, covering the rest of the mug with plastic wrap to protect it. Then I handed them off to my husband, Jeff, who's handier with spray paint than I am. He gave them each a few coats of chalkboard spray paint. Then,  I carefully peeled off the tape and plastic wrap and touched up any mistakes with an exacto knife. To prime the area for chalk, you need to scribble all over it with chalk first and then wipe it off. Now they were ready to gift.. I added in some chalk in a little cello bag along with coffe or hot chocolate and some cute marshmallow snowmen and a candy cane! 


Click here to order Stampin' Up Products Online from me!

Thursday, January 3, 2013

Ornaments!


I am sharing something with you today that was NOT made by me :)

My mother-in-law was very ambitious and made a bunch of these ornaments, similar to one on the front cover of the Holiday catalog! They turned out so pretty! Here are the three beautiful ones she gave my husband and I!  The first one was for me - Hello Kitty. I have always loved hello kitty so this was perfect! 

 
Then there are the Mickey and Minnie ones for Jeff and I. We all spent some great time at Disneyworld this year so these ornaments will be the perfect momento for my tree for this year and years to come! Thank you so much for these lovely handmade ornaments! We love them!


Click here to order Stampin' Up Products Online from me!

Wednesday, January 2, 2013

Clothespin Wreath


I made a couple of wreaths like this for my craft fairs last year and one for myself, of course! I used mod podge to adhere the paper to the clothespins (retired SU holiday paper) and then hot glued them onto a wooden wreath circle. I alternated which direction the spring sides of the pins to the center and outside so that you can pin stuff on both directions. I ended up using mine to hold my christmas cards-- I love how this turned out. A great way to display cards!


Click here to order Stampin' Up Products Online from me!

Wednesday, December 12, 2012

Hand Sanitizer holder


Isn't this the cutest little gift? I love how these little guys turned out. They fit a mini hand sanitizer from Bath and Body works! To make these I used the Cannery die set to make the Jar fronts. The jar shape isn't quite large enough so you need to fold your paper so it doesn't cut off the bottom part and then unfold and use a corner rounder on the bottom two corners. I used an oval punch to cut out the center so you can see the scent of the sanitizer that is inside on the front but on the back I left it whole. Then you make a little box out of card stock to hold it all together. Add some jar tops, cut out with the cannery dies and some bakers twine to make it extra cute! This is one of the projects options to make for my holiday gift class this year.  I also made a bunch of these little cuties in different papers for the craft fairs I did this year! They were a hit!


paper:  Festival of Prints designer paper pack, cherry cobbler, lucky limeade
big shot: Cannery Framelits Dies
other: bakers twine, Simply Scored plate, sticky strip, Corner rounder, Oval punch


Click here to order Stampin' Up Products Online from me!

Monday, December 10, 2012

Notebook Gift


Here is another cute and easy gift idea for the holidays. This notebook holder fits a junior legal pad (they're like 5 x 7) and is made from a sheet of 12x12 paper. You fold and score the paper to fit around the legal pad and pen and then decorate the cover however you like. I wanted to use the  pretty papers from the festival of prints designer paper pack, but they are a little bit shorter than the front so I framed it with a coordinating cardstock layer and added some ribbon to dress it up. Then I cut out the cool label shape from the apothecary accents die set with the big shot and stamped the sentiment "you are simply wonderful" onto it. This I added on with some bakers twine. For a finishing touch I added paper inside the pen. You just  need a little strip and then you take apart the pen and wrap it around the ink shaft and then put it back together. The RSVP pens work best for this. 

I forgot to take a photo of the inside but I also covered the top of the legal pad that is above where you tear off the pages with designer paper so it's pretty on the inside too!

stamps: friendly phrases
ink: early espresso
paper:  Whisper white, Early Espresso, Crumb Cake, Festival of Prints designer paper pack 
big shot: Apothecary Accents Framelits Dies
other: bakers twine, Simply Scored plate, seam binding ribbon, junior sized legal pad, sticky strip, RSVP pen


Click here to order Stampin' Up Products Online from me!

Saturday, December 8, 2012

Snowman Soup!


Here's another variation of Snowman soup - this is always a fun project to make around the holidays and is great for anyone on your list that you just want to give a little something fun! In the past I have made snowman soup in a mug  but this time I wanted to make the container look like snowman. I used the Fancy Favor die to cut out a box with white card stock. Then I cut just the front piece again in black to make the hat. I used another piece for the hat brim, just a strip of black. Then I punched a couple of small circles for the eyes and a triangle (cut off one point of a star punched out of orange). to make the cheeks pink I used some chalk.

To dress him up a bit, I used some ribbon and a flower on his hat!  I punched a hole on each side of the bag and used ribbon for a handle. 

Inside there is a hot cocoa packet, some hershey kisses and a candy cane. You can also add marshmallows if you'd like but I didn't this time…

paper:  black, white, pumpkin pie, real red
big shot: Fancy Favor Die
other: Stitched grosgrain ribbon, small circle punch, star punch, flower punch, self adhesive pearl, polka dotted scalloped ribbon


Click here to order Stampin' Up Products Online from me!

Friday, December 7, 2012

Coaster Sized Calendar


These coaster sized Calendars are great for anyones desk! To make these I covered a 4 inch cardboard coaster with designer paper on both sides. Then I simply added a little mini calendar (purchased) with a coordinating border piece behind it. To add a little more fun to this project, I purchased some binder clips and covered them with coordinating paper and added a ribbon! This is an easy and very fun project! I made a bunch of these for my local craft fair booth this year.


Click here to order Stampin' Up Products Online from me!

Thursday, December 6, 2012

Hershey Nugget Gift


Here is one of the projects available to make at my Holiday Gift Class! Everyone loves chocolate which makes these the perfect little gifts. To make these  made a little tray out of gumball green card stock and stamped trees on it. You don't see them very well in the picture but you can see them on the backside of the tray. then I wrapped the Hershey nuggets using different papers from the Be of Good Cheer Designer Series paper pack and put it all in a cute little cello bag (this is a pretzel sized bag from the candy section of the local craft store).  

The sentiment Merry Christmas is from the teeny tiny wishes stamp set and is punched out with the oval punch and layered over a cherry cobbler scalloped oval. 
Then just add some ribbon for the finishing touch. 


stamps: Chock full of cheer, Teeny Tiny Wishes
ink: Gumball Green, Cherry Cobbler
paper:  Whisper white, Cherry Cobbler, Gumball Green, Be of Good Cheer Designer Series paper pack
other: bakers twine, oval punch, scallop oval punch, Stitched Satin ribbon in Gumball green, pretzel bag from craft store, Hershey Nuggets


Click here to order Stampin' Up Products Online from me!

Thursday, November 29, 2012

Designer Paper Tile Coasters


I made a few sets of these coasters for my last craft fair, using up some designer papers! I love this retired paper design… I think It's called spice cake. 


 These aren't hard to make but do involve a bunch of steps so they take a few days from start to finish by the time you do it all!  To make these, I used mod podge to adhere the paper to the tiles. To make them water-resistant you will need to use a sealer as well. I used several coats of acrylic spray sealer, waiting for it to dry between coats. (I did this outside on my porch since it's very stinky). I also glued cork onto the bottoms so that they don't scratch your table!


For the craft fair I wanted to tie them together but wanted shoppers to know that they were all different designs so I created these cute tags that show the different patterns in each stack. That way, they know what they are getting. I love how these turned out!


Click here to order Stampin' Up Products Online from me!

Tuesday, November 27, 2012

Ornament Gift Card Holder


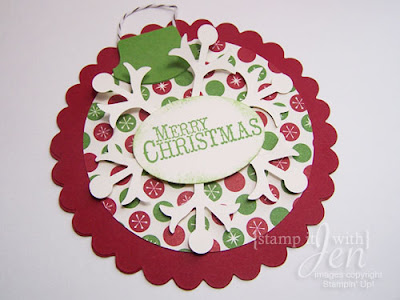
Need a cute gift card holder? This one is simply made with a few basic big shot dies! You need the Scallop Circle, 3 1/3" circle and Snowflake Flurry Bigz dies to make this. I simply cut out two big scallop circles from Cherry Cobbler Cardstock, a 3 1/3" circle from Designer Paper and a snowflake from white -- all using the big shot. Then I put it all together, adding a sentiment in the middle and making an ornament top using the round tab punch (retired) to hold the bakers twine. 

For the back side, cut your second scallop circle in half and glue it on to the back of the first one, just along the edges to make a pocket. I didn't have any gift cards lying around so this one is holding my Kohls 15% off coupon … he he he … but it's the same size as a gift card so you get the idea! 


stamps: Chock full of cheer
ink: Gumball Green
paper:  Whisper white, Cherry Cobbler, Gumball Green, Be of Good Cheer Designer paper pack
Big Shot: Scallop Circle Bigz Die, 3 1/3" circle Bigz Die, Snowflake Flurry Bigz  Die
other: bakers twine, circle punch, XL oval punch, round tab punch (retired)


Click here to order Stampin' Up Products Online from me!

Saturday, November 24, 2012

Snowman mints treat


I made a bunch of these cuties to sell at the last craft fair I did. These are simple to make if you have the right punches.  You cover the peppermint patties with scalloped circles and then layer the snowman circles over the top. I didn't have small circle stamp and didn't want to glue on buttons for all of them so I used a new pencil with a fresh eraser top, using the eraser as a stamp. It's the perfect size! the nose is a point cut off from a punched star and the pink cheeks were created by adding on pink chalk with a q tip.  Then I put them in a skinny pretzel bag (found in the candy making  section at the local craft store) and tied the top with ribbon. The tag says "some of my best friends are flakes" and is from an old retired stamp set I had! 

I think he's just adorable!


Click here to order Stampin' Up Products Online from me!

Thursday, November 22, 2012

Happy Turkey Day!


Happy Thanksgiving!


I hope everyone is having a great day and spending time with family and friends!

Here is a blast from the past--- if you've been reading my blog for awhile,
you might remember these funny turkeys I made a couple years ago ;) Here is the original post.


Click here to order Stampin' Up Products Online from me!

LinkWithin

Related Posts with Thumbnails