Showing posts with label Dark and Dreary. Show all posts

Wednesday, May 2, 2012

Dark and Dreary Farewell


Happy Halloween? Just kidding - but I do want to share with you some of the fun things I made with the set Dark and Dreary - since it will soon be gone after May 31! Check out the cool Halloween projects and contact me if you need to add this set to your collection! Click on any of the captions to visit the original link!

Love the owl in this set - wouldn't even have to be for Halloween.

A cute little treat holder!
Fun Technique using Acetate and tissue!


Spidey treat holder!


Popcorn Slider


Here is what the whole set looks like! You can contact me to order
or order it online in clear mount or wood mount until May 31.


Click here to order Stampin' Up Products Online from me!

Friday, October 14, 2011

Halloween Treats!

Here is a cute little treat holder. I made this using the Simply Scored tool. It's made from a piece of 6x6 Cardstock. You score in at 2" from each side, then make diagonal marks into the four corners. Fold it up and punch holes and thread shut with ribbon. Here's a top view:


Then I decorated the side panels using the stamp set Dark & Dreary.


stamps: Dark & Dreary
ink: basic black
paper:Tangerine Tango, Basic Black, old olive, whisper white, crumb cake
other: circle punches, simply scored

Wednesday, October 12, 2011

Owl Card!

Here is a great fall card using the owl from the Halloween set Dark and Dreary. I like how the owl can be used for something other than Halloween like I did on this thanks card. I stamped the owl inside a frame created with the Designer Frames big shot embossing folder. I created a moon behind him by masking a circle and sponging over it.

For the background I created a textured piece for the back ground using the square lattice embossing folder and sponging over it. I also used a strip of the Special Edition patterned paper and a strip punched out with the Lace ribbon border punch!

stamps: Dark and Dreary,
ink:Soft Suede, pumpkin pie
paper: soft suede, pumpkin pie, special edition designer paper
other: Lace Ribbon Border punch, Square lattice and Designer frames embossing folders, sponges, 3/8" taffeta ribbon.


Thursday, September 22, 2011

Stained Glass for Halloween

Here is a card we are making at my Technique Class tonight! Isn't it cool? I used a technique called "Stained Glass". If you like techniques, make sure to sign up for my next class. I have another technique class in October and then I'm taking a break from them until the new year.

For this card I used the stamp set Dark & Dreary. I used the spider along the bottom of the gray cardstock and then added a strip of black that I embossed with the spider web embossing folder. I also added some black satin ribbon. I don't usually use the same color ribbon and cardstock together like this but I liked the tone-on-tone effect it gave this card. then I added on the square using the Happy Halloween stamp and the stained glass technique. Isn't it cool?


stamps:Dark & Dreary
ink: Black
paper: basic gray, black
other: spiderweb embossing folder, black satin ribbon


Friday, October 15, 2010

Halloween popcorn slider

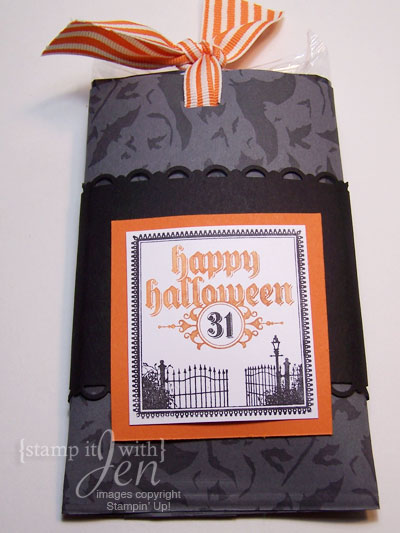
Another Halloween treat to share today. This one is a Popcorn slider. These are really easy to make. You just decorate a piece of card stock big enough to fit around your popcorn. I used the Bring on the Bats roller to stamp mine. Then you adhere the cardstock around the popcorn (but don't glue it TO the popcorn). You also need to adhere the bottom shut. I used some adhesive and then to make it look cute, ran it through the paper crimper just a bit (like 1/2" up) to make the edge look crimped. Then you can decorate the pocket anyway you like. I used the cool Happy Halloween stamp from the set Dark and Dreary.

Then you need to make two slits or holes towards the top of the open pocket for the ribbon to go through. You need a really long piece of ribbon, put it all the way around the popcorn the long way, place the popcorn with the ribbon wrapped around it into the pocket and then put the ribbon through the holes you made, from the inside of the pocket to the outside. then tie a knot in the ribbon. Now you should be able to pull on the knot and have the whole popcorn slide in and out of the pocket. Here's how mine looked:

Super cool, right?
Hope you have fun if you try to make these!

stamps: dark and dreary, bring on the bats roller
ink: pumpkin pie, black
paper: gray, black, pumpkin pie, white
other: ribbon, punch, scallop trim border punch, crimper


Tuesday, October 12, 2010

Spidey Treat...

Another cute treat made with the Big Shot Candy Wrapper Die. I have to admit, these little treat wrappers are a little tricky to put together at first but once you make a few, it definitely gets easier. The hardest part is just twisting it right at the ends. Make sure you fold over all the score lines really good before you try to put it together!

For this one, I used concord crush for the treat wrapper. Then I wrapped a piece of patterned paper from the Nite Owl designer paper around it. I used the scallop trim border punch on the patterned paper to make it even cuter. Then I made that cute flower shape by punching two scalloped circles out of black cardstock and scoring and folding them into the flower shape. Last, but not least, I stamped the black spider onto white and attached him with a dimensional. Super cute.... don't forget to put candy inside!!

stamps: Dark and Dreary
ink:black
paper: concord crush, black, white, Nite Owl
other: Candy Wrapper big shot die, scallop circle punch, scoring tool and ruler


LinkWithin

Related Posts with Thumbnails