Showing posts with label technique. Show all posts

Friday, April 5, 2013

More Mosaics

 
One more mosaic card to share - this was the other technique card from class. Have you ever used the double sided multipurpose adhesive sheets by sizzix? They're kind of hidden in the back of the Stampin' up catalog by the other specialty papers... they are super awesome because they work for so many different techniques. For this technique you cut up lots of little paper scraps and stick them to the sheet, then dump embossing powder over the whole thing and emboss it -- it will stick to the sticky spots and emboss--- cool, right?

Plus - it's a great way to use up scraps!


stamps: friendly phrases
ink: gumball green, primrose petals, Print Poetry Designer Series paper stack, 
big shot: apothery accents framelits die (for sentiment)
other: multipurpose adhesive sheets, stitched ribbon - midnight muse, silver embossing powder, embossing heat gun and tray.

Wednesday, April 3, 2013

Mosiac Technique


Where does time go? I haven't had a chance to share these cards yet from last week! We made this card at my Technique class - this technique is stamped mosaic! I Love how cool it looks with the boat from the Open Sea stamp set! I also used a nautical color scheme of not quite navy, crumb cake, white and cherry cobbler. 

To make the "mosaic effect" I cut up some of the extra rubber that comes around your stamp sets when you get them (I had some old ones I had saved) and stuck it onto a wood block (scrap from hubbys wood shop). THis gives you a "mosaic" background stamp. You stamp this over your image with Versamark ink and emboss with clear ink -- then fill in between the spaces by sponging (I used crumb cake but I've seen this technique done with a darker color too). 


stamps: Open Sea, Essentials
ink:Night of Navy, crumb cake, cherry cobbler, versamark inkpaper:Night of Navy, crumb cake, cherry cobbler, whisper white
big shot: chevron embossing folder, 
3" and 3 1/2" circle bigz dies
other: 2 1/2" Circle punch, sponge, clear embossing powder, bakers twine, rubber scraps, wood block, 1 1/4" circle punch 


Wednesday, March 27, 2013

Mosaic Birthday Card!


Here is a birthday card using a cool technique- mosaic! For those of you coming to my class this thursday we will be making a card similar to this one (I changed it up a bit and used colors and different paper since the Sale-a-Bration paper is no longer available). This is a fun and easy technique and is a great way to use up paper scraps! 

Here is a close-up so you can see how the paper is embossed between the "tiles" of paper. 


stamps: essentials
ink: raspberry ripple
paper: raspberry ripple, pacific point, baja breeze, 2 sided sticky paper, sycamore street designer paper (SAB)
big shot: Vine street embossing folder (SAB)
other: button, bakers twine, oval punch, dimensional, silver embossing powder & heat gun.  

Click here to order Stampin' Up Products Online from me!

Sunday, March 3, 2013

One Sheet Wonder!


Thanks again to all the ladies that came to my class this week -- it was a super fun group!  We did a "One Sheet Wonder" This is a fun technique where you stamp a full sheet of 8.5 x 11 paper-- all over in a random fashion with a few different colors and then cut it up to make a set of coordinating cards with it!  We used the set Secret Garden and several of the InColors to make this set -- Raspberry Ripple, Gumball Green, Summer Starfruit and Primrose Petals. 

If you are interested in seeing more posts using this technique I once made a set using the Nature Walk stamp set here. -- And even longer ago I made a set using the Fifth Avenue Floral set here.

Here is a shot of how cool the cards all look together:


We made a total of 8 cards and a tote. Here are pix of all the individual cards:


Click here to order Stampin' Up Products Online from me!

Saturday, February 9, 2013

Faux Quilting Technique


This is the other technique for the Technique class this month - I don't know if you can tell very well in the photo but not only is the heart patchwork, it also has a quilted texture. This technique is easy to do with just some patterned papers and an embossing folder! 


stamps: Teeny Tiny Wishes
ink: early espresso
paper: Crumb Cake, primrose petals,  Print Poetry Designer Series paper stack
big shot: square lattice embossing folder, lacy brocade embossing folder
other: crumb cake seam binding ribbon, word window punch, dimensionals

Click here to order Stampin' Up Products Online from me!

Thursday, February 7, 2013

Chalkboard Technique


Tonight is my Technique class and I'm teaching the Chalkboard technique. Chalkboards seem to be really hot right now - I've been seeing them pop up all over online in card making and home décor!  This technique is pretty simple but makes a stunning card, don't you think?


stamps: Wish Big single stamp
ink: Whisper white
paper: Tangerine Tango, pool party, black, Sycamore Street Designer Paper (SAB)
big shot: Framed tulips embossing folder
other:pool party bakers twine, scissors to make flags


Click here to order Stampin' Up Products Online from me!

Monday, November 12, 2012

Shaker Ornament Card


Here's another shaker card made with the shaker frames - I love these, they make shaker cards so easy! For this Card I used the ornament from the Chock Full of Cheer Set as the background image of my shaker. then I stamped the ornament top on the top layer and filled it with Chunky glass glitter. I added some bakers twine to the top to give it the illusion of hanging. Shaker cards are so much fun and perfect for holidays! Like this shaker card? Check another shaker card I posted using the Happy Hour set here.


stamps: Chock full of Cheer
ink: Gumball Green, Cherry Cobbler, Whisper White
paper:  Whisper White,  Cherry Cobbler, Be of Good Cheer Designer paper pack
other: Circle punch, Glass Glitter, Window Sheet, Shaker Frame, Bakers Twine


Click here to order Stampin' Up Products Online from me!

Monday, October 29, 2012

Joy Card


Have you tried using the Stampin' Spritz bottles yet from stampin' up? These are really cool… they make it a snap to make your own spritz colors! All you need to do is take the bottle and fill it up about 2/3 of the way with rubbing alcohol and then add a few drops of your favorite ink color using a re-ink bottle. Then shake it up and you're ready to go. Just be careful to protect your work surface… sometimes the spritz is a little hard to control where it goes!!

For this card I made a spritz using gumball green. Then I cut out the letters to spell joy with the big shot (Typset Alphabet Bigz Die). Then I used the mist to spray the green over them. Remove the letters and you have a fun word masked out in white. 

To add more sparkle to this card I also used the brushed silver cardstock and stamped the sentiment Merry christmas by inking up my stamp with the silver shimmer paint! 


stamps: Greetings of the season,
ink: silver shimmer paint, gumball green re-inker in sprtiz bottle
paper:  whisper white, gumball green, brushed silver
Big Shot: framed tulips embossing folder, apothecary accents framelits die, Typset Alphabet Bigz Die


Click here to order Stampin' Up Products Online from me!

Saturday, October 27, 2012

Cocktail shaker card!


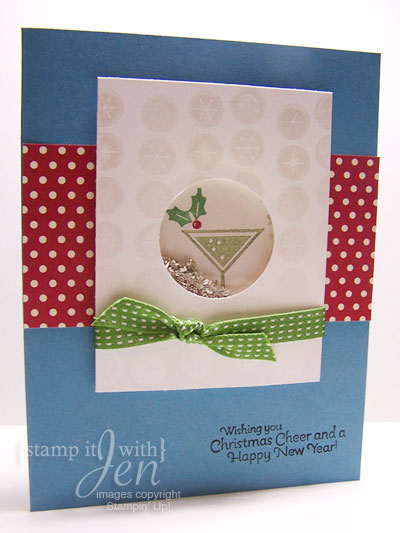
Have you tried using the shaker frames from stampin' up to make shaker cards yet? They make it so easy. They are stick on both sides and already in circle shapes that coordinate with our different sized punches. All you do is stamp an image that will fit inside your circle, stick a shaker frame over it, put something in it to shake (I used the chunky glass glitter) and then remove the top liner to reveal the sticky surface and put a piece of window sheet over it! Ta dah… shaker. Then I punched a hole in another piece of card stock to make a top window and cover the frame. It's that easy! 

To add a little more sparkle to this card I used the Illuminate glimmer watermark ink from the holiday catalog. This ink looks really cool on white card stock. It adds a pretty shimmer that it subtle but adds so much fun to your card. I stamped the circles from the chock full of cheer set to add some bling to this card.  I used it on the top piece… you can see it if you look closely...


stamps: Happy Hour
ink: Black, gumballl green, garden green, cherry cobbler, illuminate glimmer watermark ink
paper:  Marina Mist, whisper white, Festival of prints designer series paper stack
other: stitched satin ribbon in gumball green, window sheet, shaker frame, glass glitter


Click here to order Stampin' Up Products Online from me!

Thursday, October 25, 2012

Glitter Window


Ready for some more sparkle? Here is another way to add sparkle to your cards- packing tape! Yep. You heard me right… That's how I made the glittery windows on this card! Here's how it works. I took a piece of cardstock and punched the holes in it for the windows. Then Take some packing tape and put it over the holes. Dump glitter over it and shake off the extra. The glitter will stick to the packing tape and make a fun glittery window! You could do this with any shape that you can punch out! For this card I stamped the trees on a piece of white card stock and put them behind the window so it looks like you're looking into a snow and glitter covered winter scene! Isn't it pretty?


stamps: Greetings of the season, Christmas Lodge
ink: white
paper:  whisper white, crumb cake, soft suede
Big Shot: Woodgrain embossing folder
other: baja breeze seam binding ribbon, square punch, packing tape, dazzling diamonds glitter


Click here to order Stampin' Up Products Online from me!

Wednesday, July 4, 2012

Herringbone Technique


Here is the other technique from the last technique class that I forgot to post! We used the set Bright Blossoms and the coordinating Summer smooches designer paper to create this Herringbone technique card.  This technique is a great way to use up designer paper scraps since you just need a bunch of little strips to make it! I used the Multi-purpose adhesive sheets to make a big sticky square to adhere to.. these work awesome for stuff like this!


stamps: Bright Blossoms, fabulous phrases,
ink: Real Red, Pacific Point, daffodil delight, old olive
paper: whisper white, daffodil delight, pacific point, bashful blue, Summer Smooches Designer paper
Big shot: Framelits dies (Labels)
other: 1" circle punch, Multi-purpose adhesive sheets, dimensionals


Click here to order Stampin' Up Products Online from me!

Monday, July 2, 2012

Baby Cards!


When I discovered the gingham technique I thought it would also work great for baby cards - and I never seem to have baby cards on hand when I need them so Inked up a bunch of gingham backgrounds in baby colors (see post here for details on the gingham background) and made some quick baby cards to have for my stash! 

These cards are also simple and use the stamp set Fox and Friends (retired) and a variety of circle punches and embellishments.  I made a couple gender -neutral green and yellow cards using the giraffe and lion. 


Here's a pink and yellow version for a baby girl using the monkey and some little flowers!


And the Boy version, using a turtle and one of the itty bitty buttons. 


stamps: Fox and Friends (retired), fabulous phrases,  teeny tiny wishes
ink: Various colors
paper: Various colors
Big shot:,Stripes embossing folder
other: Bakers twine, dimensionals, Various circle punches, itty bitty buttons, itty bitty shapes punch pack, self adhesive pearls


Click here to order Stampin' Up Products Online from me!

Saturday, June 30, 2012

Gingham Technique


I was going back through my pictures and realized I never posted pix of my last Technique class!  Somehow these cards just slipped through the cracks so I thought I'd post them now. 

The first technique we did was the "Faux Gingham" technique… Basically you apply ink to the striped embossing folder with a brayer and run it through the big shot with your paper inside and then turn it 90 degrees and do it again. This creates a cool textured gingham pattern! I thought it would go perfectly with the giant Cherry from the Mouthwatering stamp set:

Of course, when you stamp this cherry, you have to emboss it too using the scented cherry embossing powder!!

Here's a close up of the card:


stamps: Mouthwatering, retired sentiment
ink: real red, garden green, early espresso
paper: Whisper white, early espresso, crumb cake, garden green
Big shot: Perfect Pennats Bigz die (for scallop circle), Stripes embossing folder
other: red grosgrain ribbon (retired), dimensionals, 2 1/2" circle punch, brayer


Click here to order Stampin' Up Products Online from me!

Monday, April 23, 2012

Telescoping Card

I just love how cute the telescoping card is… I've been seeing these around on blogs and such for a while but haven't had a chance to try one myself so when I decided to do a "cards that move" class I knew it would be the perfect opportunity to try it out. It's really pretty easy to make.. the hardest part is making sure when you assemble your layers you have them in the right direction so when you turn it open, everything is facing upright! Here is what it looks like closed:


To stamp on this card I used the stamp set Mixed Bunch… I finally caved and bought this set out of the Occasions Mini. I told Myself I didn't need another flower set but after seeing so many cute cards made with it I finally decided I did! then for the top layer I used the circle birthday image from the hostess birthday set. I'm going to miss using this hostess set next year… it's perfect for birthday sentiments!

stamps: Mixed Bunch, Happiest Birthday Wishes
ink: Melon Mambo, Lucky Limeade,
paper: Melon Mambo, whisper white
other: Big Shot, lucky limeade ruffled ribbon, brads, 3 1/2" circle big shot die, Scallop circle big shot die, XL scallop punch, 1 3/4" Circle punch.


LinkWithin

Related Posts with Thumbnails