Monday, December 6, 2010

Sweet Bunny Card!


One of my favorite sets in the holiday mini catalog is Merry Crittermas. It has such cute little critters to color! For this card I used the bunny and the sentiment " wishing you a season of sweetness". This is a really simple card. I just stamped the bunny onto white cardstock and colored him using makers. Then for the card base, I used the Northern Flurry embossing folder to create the pretty snowflake background. I really love this folder, It's so pretty! Then I used some taffeta ribbon and a "fork bow" to finish it off! Hope you like him!

stamps: merry crittermas
ink: black
paper:marina mist, whisper white, rose red
other: taffeta ribbon, northern flurry embossing folder


Sunday, December 5, 2010

Holiday Greetings!


Hello again! I'm finally able to find a few minutes to update my blog. I spent the past two days at the Stoughton Victorian Holiday fair and the past few weeks getting ready for it. I will show you photos of what I made soon (haven't downloaded them yet). The fair was a lot of fun but was taking up all of my time... so hopefully now things won't be so crazy - although with Christmas only a few weeks away, they probably will be!

Here's a card I made using the Serene snowflakes stamp set. I stamped it onto crumb cake card stock using whisper white, cherry cobbler and early espresso inks. The cool snowflakes are punched out using the Northern Frost decorative strip die for the big shot. Then I put a red glimmer brad in the center of one for some added sparkle! The "holiday greetings" sentiment is from the set Sincere Salutations.

stamps: sincere salutations, serene snowflakes
ink: whisper white, cherry cobbler, early espresso
paper: crumb cake, cherry cobbler, early espresso, whisper white
other: glimmer brad, Northern Frost Die, dimensional, border punch


Sunday, November 28, 2010

Online Sale Going on until Tuesday!


From now until Tuesday, there are some great deals available only on the website! Plus, Free Shipping with a $150 order! Click the image above to check it out!

Tuesday, November 16, 2010

Penguin from Owl Punch

I can't get enough of this owl punch-- I used it to make this penguin! Isn't he cute? You simply cut off the owls ears to make it look like this. I used the little heart piece to make his beak! So much fun! The card is really simple too. I stamped some snowflakes on Marina Mist Card stock using the Serene Snowflakes set and then tore it before adhering it to the white card to make it look like a hill of snow! then a Simple Merry Christmas on the bottom and some red satin ribbon to make it look pretty.

stamps: Serene Snowflakes, Christmas Greetings
ink:Marina Mist
paper:Marina Mist, Whisper White, black, Pumpkin Pie
other: Owl Punch, real red satin ribbon, dimensional


Sunday, November 14, 2010

Christmas Card Time!

Sorry! I've been super bad about keeping up with my blog right now. I've been so busy working on holiday projects and doing workshops that I haven't had much free time. Good news is, I have a ton of projects to share... now I just need to find some time to share them!

Here's a card that we did at my recent Christmas card stamp-a-stack. Didn't it turn out cool? You can't really tell in the photo but the white piece in the center is spritzed with some a mix of shimmer paint and alcohol that I put in a little spray bottle. It makes a great shimmery mist that adds just a little sparkle! I think this one was the champagne color. Then I stamped the wreath from the hostess set Northern Hearts. The bird is punched out using real red card stock and the XL bird punch. Then it's framed with some chocolate chip card stock. The card base is Crumb Cake with snowflakes stamped on it from the same Northern Hearts set with Versamark ink. The sentiment is from the stamp set Heard from the Heart.

Hope you enjoy this card. I will try to find time this week to post some more!

stamps:Northern Hearts, Heard from the Heart
ink:real red, wild wasabi, versamark
paper:Crumb Cake, chocolate chip, whisper white, real red
other: XL bird punch, champagne shimmer paint


Saturday, October 16, 2010

Pumpkin Treat holder

Check out this cute pumpkin! He's so easy to make if you have a big shot. I just cut out six ovals from pumpkin pie card stock using the Scallop Oval big shot die (now I have to figure out what to do with all my extra scallops since I didn't need them for this guy). Once you have enough ovals you just need to sponge the edges with pumpkin pie ink to make them look aged. Then glue 3 together to make your front and 3 for the back. I made a face by punching out a square and cutting it up into triangles. And the mouth is just the oval punched out twice to make a smile. For the stem I used the designer label punch and for the leaves I used two petals from the 5-petal flower punch!

Then I just made a little box from pumpkin pie cardstock to go between the two layers. I think It's about 3 inches high by one inch wide. You can make yours any size you'd like but mine fits two fun size m&m packages.

Last, I made the handle by punching out a long strip of old olive cardstock with the scallop ribbon border punch!

I just love how cute he turned out!

Friday, October 15, 2010

Halloween popcorn slider

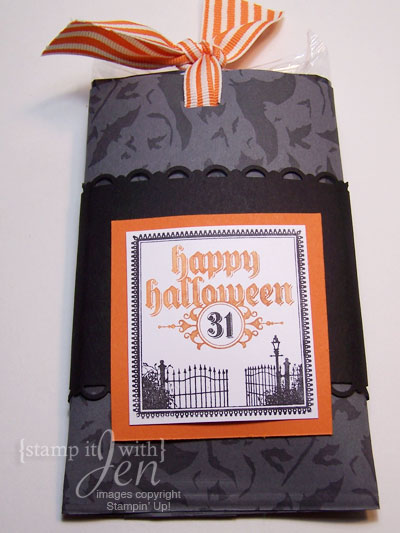
Another Halloween treat to share today. This one is a Popcorn slider. These are really easy to make. You just decorate a piece of card stock big enough to fit around your popcorn. I used the Bring on the Bats roller to stamp mine. Then you adhere the cardstock around the popcorn (but don't glue it TO the popcorn). You also need to adhere the bottom shut. I used some adhesive and then to make it look cute, ran it through the paper crimper just a bit (like 1/2" up) to make the edge look crimped. Then you can decorate the pocket anyway you like. I used the cool Happy Halloween stamp from the set Dark and Dreary.

Then you need to make two slits or holes towards the top of the open pocket for the ribbon to go through. You need a really long piece of ribbon, put it all the way around the popcorn the long way, place the popcorn with the ribbon wrapped around it into the pocket and then put the ribbon through the holes you made, from the inside of the pocket to the outside. then tie a knot in the ribbon. Now you should be able to pull on the knot and have the whole popcorn slide in and out of the pocket. Here's how mine looked:

Super cool, right?
Hope you have fun if you try to make these!

stamps: dark and dreary, bring on the bats roller
ink: pumpkin pie, black
paper: gray, black, pumpkin pie, white
other: ribbon, punch, scallop trim border punch, crimper


LinkWithin

Related Posts with Thumbnails